27 September, 2014

How to install gparted (partition editor) on Ubuntu 14.04 LTS / Debian wheezy / Raspbian

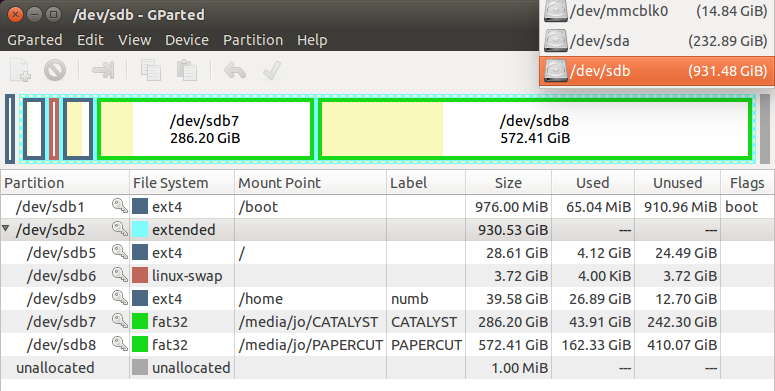
Here is how to install one of the coolest partition editor for  Ubuntu 14.04 / Debian wheezy / Raspbian

Gparted a GUI based application that helps to work with partitions on your memory devices. It is packed with many features like
  •     Create partition tables, (e.g., msdos or gpt)
  •     Create, move, copy, resize, check, label, set new UUID, and delete partitions
  •     Enable and disable partition flags, (e.g., boot or hidden)
  •     Attempt
  •     Create space for new operating systems

GParted works with the following storage devices:
  •     Hard disk drives (e.g., SATA, IDE, and SCSI)
  •     Flash memory devices, such as USB memory sticks and Solid State Drives (SSD’s)
  •     RAID Devices (hardware RAID, motherboard BIOS RAID, and Linux software RAID)
  •     All sector sizes (e.g., devices with 512, 1024, 2048, 4096 byte sectors and more)


Update your software repository listing using the apt commands from the terminal:

sudo apt-get update


Now install gparted using the below given command

sudo apt-get install gparted


Once the installation is complete, launch gparted using the following command and provide the root credentials


sudo gparted


Read rest of entry

07 July, 2011

Change the DocumentRoot of Apache webserver (/var/www) in Debian / Ubuntu

The document root (also called as the web root) of the Apache web server is located at the /var/www directory by default. Document root is the place where we find all the web pages and server scripts. These files are loaded on the browsers when we type in a particular url to point to that server. 

The /var/www directory doesn't allow access for a user who doesn't have the root permission. It's a headache task to switch to the root mode by typing in the root password everytime even though you know the password, since you may have to change your webpages or scripts during its development stage  very frequently. So a better idea to avoid this problem is to change the default Document root directory to some other location which doesn't require root permission for access.


Change it dude !!!
- - - - - - - - - - - - - - - - - -#

Inorder to change the document root,

#1. Make a directory somewhere inside your home directory to use as the Document root. (not necessarily be home... you can make it anywhere). I named it 'www'

$ mkdir /home/jo/www

#2. Now we have to edit the one of the configuration file of the Apache webserver. The file is located @  /etc/apache2/sites-available/default (requires root permission to edit it).

$ sudo gedit /etc/apache2/sites-available/default

The file will be opened up in the gedit text editor. Now you have to edit the DocumentRoot directive in this file. Replace the /var/www with the /path/to/your/new/document/root in the lines 4 and 9 as shown in the figure below.


#3. Restart the apache webserver.

$ sudo /etc/init.d/apache2  restart


Now test it !!!
- - - - - - - - - - - - - - - - - -#

#1. Create a html/php file inside the Document Root directory (mine is @ /home/jo/www).

#2. Take the terminal and navigate to the Document Root directory (using cd command). Use chmod command given below to allow read+write+execute permission to all.

$ chmod 777 *

#3. Take your web browser and type in http://localhost and hit the enter key! The apache server will load the contents of your Document Root directory as in the figure.


Hope you have done it right!!!


Read rest of entry

Use the Debian Squeeze DVD/pendrive as a package repository

The Debian Squeeze DVD contains many application level packages which are not installed during the base operating system installation. Only core packages are installed during the basic Debian Operating system installation. For example the DVD is loaded with the graphical display managers such as Gnome, KDE and XFCE, but during the installation you can select only one among them.  There are a lot more stuff in the dvd, such as vlc media player, phpmyadmin, mysql etc. Here I am sharing how i used these Debian squeeze DVD as a repository to install those packages.

Adding the dvd to the repository
                 --------------------------------------------------

Take the terminal and type the following

$ sudo apt-cdrom add


This will add your DVD to the repositories list. 


For those who are using the pendrive as the installation media, pendrive should be mounted on the /media/cdrom directory. This can be done in two steps.


#1. Plug in the USB pendrive, then the new block device will be added under the /dev directory. We have to find this block device location for mounting and using the device. Use the following command to detect the block device's filename (selected in the image).
$ sudo fdisk -l


#2. Mount the block device into /media/cdrom.  

$ sudo mount  /dev/sdb1  /media/cdrom/


#3. Add the cdrom to the software repository list, as described earlier in the  case of the DVD.

$ sudo apt-cdrom add


Installing Packages
-------------------------------------
Now install the packages using the apt package manager. Check the sample below :- 
$ sudo apt-get install vlc

Thatz up...This trick will work for Ubuntu also...
Read rest of entry

20 May, 2011

Setting up local dns cache and public dns address for "lightning" speed browsing in Ubuntu


When it comes to internet, reasonable speed is always an uncomprimisable thing. That may be a crucial reason for making you sit infront of your machines for hours and days. So the lightning speed can be achieved with your ubuntu box in two ways. They are 
  • Use faster and free domain name servers like google's pubic dns or OpenDNS (first throw the one provided by your service provider). Hope you will check one of my past article written in Crack Bytez.

  • Maintain a local dns cache in your machine itself.  So that you can do a good amount of address resolution for frequently used websites within your machine itself, and that saves a reasonable amount of time.

Here i am planning to bring both of these techniques together in a simple manner. Though there are many applications for local DNS caching in ubuntu [ such as dnsmasq, pdnsd, bind9 ] are available, bind9 seems to be a good option for me...

Starting with BIND9  DNS server in Ubuntu

Bind9 (Berkly Internet Naming Daemon)  is the most widely deployed DNS server. Bind9 is available in the ubuntu main repository itself. So you don't need to add some additional repository for installing it. Use the following command line or search for 'bind9' in Synaptic package manager to install it. 

$ sudo apt-get install bind9

Bind9 allows different type of configurations, and our point of view is on configuring it as a caching server. In this configuration BIND9 will find the answer to name queries and remember the answer for the next query. This can be useful for a slow internet connections especially based on mobile internet. By caching DNS queries, you will reduce bandwidth and (more importantly) latency. It increase network performance by caching IP addresses of commonly visited websites instead of retrieving them from the public DNS servers maintained by ISPs at each request.

Configuring the BIND server 

#  First you have to set your machine's address (127.0.0.1) itself as the primary dns address.  This can be done with the help of Network manager or by editing the /etc/resolv.conf file in your ubuntu box. Check the screenshot below..

  • using Network manager:: select the connection and click on the edit. Then choose the IPv4 settings tab and add 127.0.0.1 to the DNS servers field.

  • editing the resolv.conf file:: If you are using DHCP then you may have to edit the resolv.conf file every time you connect to the internet to make bind work properly.


Now change the bind configuration file to add some external DNS servers for resolving a new address that is not cached on your local cache at that time. If you are not adding an external dns server, then it will not be possible to resolve a new address request comes from the browser.  Here i recommend google's public dns or OpenDNS addresses to add in the BIND configuration file. This servers may be sometimes faster and reliable than your ISP's Domain Name Servers. You can find the best DNS server applicable for you by checking in this post. Here is how i have added it

#  First open the file 'named.conf.options

$ sudo gedit /etc/bind/named.conf.options

#  Now uncommend the section 'forwarders'. Replace the '0.0.0.0' with the dns server address applicable to you (Check the figure).

#  Restart  the BIND server:

$ sudo /etc/init.d/bind9 restart


Thatz it. We are almost done. Now use the dig command to see the change in speed. If you "dig" a domain name multiple times you should see a drastic decrease in query time: between the first and second query. This is due to the server caching the query. See what happened when i dig twitter from my terminal three times concecutively. See the change in the Query time.

$ dig twitter.com


Time is up. Go Applications > Internet > firefox and experience the lightning speed...

Read rest of entry

16 May, 2011

Download your gmail inbox to harddisk for offline usage in Ubuntu

I don't know when i have started using gmail. But now, i am wondering why it doesn't makes me bored eventhough i am watching the same appearence and 'looks of gmail' for more than five years. Gmail is something more than the 'appearences' since it provides a secure and fully fledged mechanism to communicate your personal and business affairs. That may be the reason why i haven't googled for something like 'best online email service' for those past years where i experienced the power of Gmail. 

Here i am introducing an application named 'Gmail Backup' that helps you to download and back up all your mails from the Gmail inbox to your computer's hard disk. The collection of mails that you backed up can be viewed and read offline with the help of some text editors, browsers or email applications such as thunderbird without going online...

 
Setup and Installation

Since the Gmail Backup is a python based application you may need some additional python libraries for running the gui. So first  install the latest version of wxPython on your ubuntu box with the help of Synaptic package manager or apt. The installation  with apt pacakge manager using terminal is given below.

#  First import the key into your apt's list of trusted keys (we both hate warnings !! and this is how we remove the warnings about the digital signature)  

$ curl http://apt.wxwidgets.org/key.asc | sudo apt-key add - 


# Add the following lines to your /etc/apt/sources.list file. Change 'natty' to the suitable one if you are using an ubuntu distribution other than Natty narwhal. 

  #wxWidgets/wxPython repository at apt.wxwidgets.org
  deb http://apt.wxwidgets.org/ natty-wx main
  deb-src http://apt.wxwidgets.org/ natty-wx main

  
#  Run the this command to update your local copy of the packages meta-data. 

$ sudo apt-get update
 

# Now install the wxPython packages using the following commands.

  $ sudo apt-get install python-wxgtk2.8 python-wxtools wx2.8-i18n libwxgtk2.8-dev libgtk2.0-dev

The packages libwxgtk2.8-dev and libgtk2.0-dev may need to be installed if a 3rd party application requires wxWidgets when building from source.
 
# Inorder to access the gmail with such an application you need to enable the IMAP option on the gmail settings. Go to your gmail inbox with your browser. Navigate to the Forwarding and POP/IMAP section on the gmail settings page to enable the IMAP as shown in the figure.


Now download the gmail Backup application from the link here. Extract the zipped file. Using your terminal navigate to the location of the zipped file.
 
#  Use the ls command to list all the files 

$ ls -l *.sh 

Run the file named gmail-backup-gui.sh to start the gui interface of the Gmail Backup application shown below.

$ ./gmail-backup-gui.sh


# Enter the required information and press the backup button to start downloading the mails. You can view the mails with the help of a browser/text editor/email application[kmail,mozilla thunderbird]. All the mails are stored in the specified folder seperately as eml files.
Read rest of entry

14 May, 2011

Does your Gmail account hacked yesterday ??? who knows


You knows !!! Gmail is considered as one among the best email services today, so people are using it for both business and personnel usage. Then comes the issue of security that protects the mails in your inbox. Make sure that your gmail account is safe and open to you only. Google offers activity information mechanism for finding weather your gmail account is hacked or not. Its simple.., you don't need to be a geek. This post will help you to identify weather someone else is accessing your inbox.


Navigate to the bottom side of the gmail inbox. I just pinned the snapshot of mine here. Check for the line starting with the sentence 'Last account activity : x hours ago at IP x.x.x.x'. There you can find a link labeled 'Details'. Click their to see the log information on your gmail inbox and make sure that you are the only one used that account.


Make sure that the IP addresses listed are the same ones that you used. Check the country, date, time and access type also, and identify weather it matches with your usage. Once i have seen a log from a different ip address on my gmail's log. It appeared to be one from Aisanet's network. (That was a my first experience of being hacked). Later i found it was not an accidental one. This unwanted access was from an  internet cafe once i used 2-3 days before the hazard, and what really happened was i really forgot to logout from my gmail account when i quit the cafe. If you feels the same, then understand this is the right time to change your google account's password. Do it  now itself, else you may be the next victim. Changing the passwords frequently is always refered as the best methode to escape from hacks and unwanted access to your personals kept on internet...

Finding ip adress of your machine

If you dont want to go technical just visit the website tracemyip to know your ip address and related details.  


If you are a unix guy, use the ifconfig command on the terminal to know your ip. The field shown as 'inet addr' corresponding to your mode of connection (eth, wlan, ppp) is the ip.


and, If you are windows guy, use the dos command ipconfig in the command prompt window to view your ip. 


Note :
  • Ip address may not be the same for every time you connects, if you are not using a static connection.. 
Read rest of entry

10 May, 2011

Installing Ubuntu 11.04 in pendrive persistently : time for pendrive OS

What about the idea of carrying your operating system whereever you go? I am not talking about bringing your laptop everywhere you go, instead use your pendrive to carry your linux distro. Not simply the live distro, you can carry your operating system with all your configurations, favorite desktop background and personal files. We can call it as a persistent installation since the pendrive linux can not only used as a means for installing linux but also it can retain the changes you made (similar to a linux installation on a hard disk). In simple terms if you store a file on the desktop or installed any new application on the pendrive ubuntu it will be there next time you boot from that pendrive.

While carrying your operating system on a USB pendrive there are many advantages. I think the most appealing one is that you will get your favourite environment wherever you go. If you are a hardcore linux user then no doubt you will find it hard to work with a 'windows only' machine, then you can use your favorite ubuntu that boots from pendrive. Another aspect is related to the security. You can use your ubuntu on the pendrive inside an internet cafe where you can expect keyloggers or other applications that can cause security breaches. Simply your online money transactions can be made secure without the help of softwares or operating system available on a cafe.

Third advantage is somewhat geeky. You can use this pendrive to remain anonymous on the internet and hack safely. Move over many machines and many networks with your handy pendrive and diminish the possibility of tracing you with the help of MAC address and IP address.

And the practical way...

I am very much font of Ubuntu as it provides a powerful environment for application development and entertainment. So i am using the latest distribution of Ubuntu, Natty narwhal (11.04) as my pendrive operating sytem. I have tested it on a Kingston DataTraveler G3 8GB pendrive. Download the iso image of the Ubuntu 11.04 from the link here. Though there are a number of ways to make persistent installation we just use the most simplest one here. For this you need a Windows (vista/7) and application called Universal USB installer (click here to download). 


Select the Ubuntu 11.04 iso image and the pendrive from the Universal USB installer to start installing Ubuntu on to pendrive. The installer will take a few mnutes for finishing the task... Done!!! your pendrive Ubuntu is ready, restart the system and boot from the pendrive to use it...
Read rest of entry

18 April, 2011

python code for taking images with webcam in Linux

Hey friends lets checkout a small, simple and cute python program for taking photos with with your webcam without the help of any third party application programs. Most probably the Ubuntu like linux distributions comes without a pre-installed application for imaging with webcam. I suggest this small piece of code because most of the linux distributions includes python  as pre-installed.

I have simplified the code to the extend that any newbie to python can understand it. Also you should install the following python library for this program to work. 

 # python-opencv
        You can install this library using synaptic package manager or apt. The package name is 'python-opencv'


Code


   import os
   import datetime
   import opencv.adaptors
   from opencv import highgui 
   import Image

   def get_image(camera):
im = highgui.cvQueryFrame(camera)
      # Add the line below if you need it (Ubuntu 8.04+)
     im = opencv.cvGetMat(im)
     #convert Ipl image to PIL image
dir(im)
print "image taken"
     return opencv.adaptors.Ipl2PIL(im) 

   #_______________find usernae___________
   a=os.popen('whoami')
   l=a.read() 
   s=l.split('\n')
   uname=s[0]

   #______________find date n time  _________
   now = datetime.datetime.now()
   now = str(now)
  
   im=None
   camera= highgui.cvCreateCameraCapture(0)
   im = get_image(camera)
   os.chdir('/home/%s/Pictures' %(uname) )
   fname='image_'+now+'.png'
   im.save(fname, "PNG")
   ####  code ends here


You can run this program using the terminal as follows

                                                           python camera.py                                                                                         


The images will be automatically stored inside the Pictures folder inside the home directory.


till the next post...

Read rest of entry

01 February, 2011

a simple ftp program with python xmlrpc

Hope you have read my post about creating a simple client server program with python xmlrpc. Now we will  try creating a sample file transfer program through which we can transfer files (text, images, movie) over the network. The logic behind this is the same that we used in the client server program shown in the above link. The remote procedure call allows to call functions placed in a remote server, passing parameters to it and receiving return values from the remote function in the server. 

1. Sending a file to remote server 

       Inorder to send a file, say a picture file we first open the file and read it's contents. Then we call the remote function in the server with file content (of the picture) as parameter. The remote function on receiving this contents as parameters will open a new file and write it into that file...

Check the ftp client and server program below...

ftp client


   import xmlrpclib
   server = xmlrpclib.ServerProxy('http://127.0.0.1:9009')
   filepath=raw_input('Enter path to file :')
   try:
         with open(filepath, "rb") as handle:
            data=xmlrpclib.Binary(handle.read())
            handle.close()
            a=server.UploadFile(data
   except:
         print "Upload failed"


 ftp server :
 

   import xmlrpclib
   from SimpleXMLRPCServer import SimpleXMLRPCServer 
   def UploadFile(filedata):
        try:
            fp="/home/jo/Downloads/file2"
            with open(fp, "wb") as handle:
                    data1=filedata.data
                    handle.write(data1)
                    handle.close()
            return True
        except Exception,ex:
            return 'error'
   client.register_function(UploadFile)
   server.serve_forever()


2. Receiving a file from remote server 

         Here we call the remote function on the server with file path as the parameter, where file path is the path to the file that is going to be downloaded to the client. Server on receiving the file path, opens file and returns it's contents to the client which called the remote function. Client will open a new file and writes the  above returned value to the file.

ftp server :


     import xmlrpclib
    from SimpleXMLRPCServer import SimpleXMLRPCServer
    def movefile(filepath):
        try:
            handle = open(filepath)
            return xmlrpclib.Binary(handle.read())
            handle.close()
        except:
            return 'error'
    client.register_function(movefile)
    server.serve_forever()


ftp client :

   import xmlrpclib
   server = xmlrpclib.ServerProxy('http://127.0.0.1:9009')
   filepath=raw_input('enter path : ')
   try:
         handle=open("/home/jo/Downloads/file1","w")
         handle.write(server.movefile(filepath).data)
         handle.close()
    except:
         print 'Download failed'


remarks ::

In the above examples the data read from the file is converted to binary format before transferring it using the Binary() function in the xmlrpc library. Also you have to change the ip to desired on replacing 127.0.0.1 to run the program on a network.        


Read rest of entry

31 January, 2011

Convert videos to 3gp, Mp4, Mp3 formats with Mobile media converter in Ubuntu

I have been searching for a cool media converter for my ubuntu box to convert my favourite videos into mobile formats like mp4 and 3gp etc... last week. I ended up with the one called Mobile Media Converter. Here i share my experience with this application. 

The Mobile Media Converter is a free video and audio converter for converting between popular desktop media formats like MP3, wma, ogg, wav, MPEG video, AVI, wmv, flv, mov and commonly used mobile devices/phones formats like AMR and 3GP video. Also iPod/iPhone and PSP compatible MP4 video are supported. Moreover, you can remove and add new formats  or devices through the internet.

The Mobile Media Converter has integrated a Youtube downloader which can be used to download flash videos and convert to any other formats. You can trim your clips for ringtone creation or any other purpose and crop your videos for removing up/down black bars or other unwanted parts of the image. Additionally, embedded subtitles can be encoded onto the video for watching  movies or shows with subtitles on devices that does not supports them.
 
You can download the this application from here. After downloading the debian package, open it with Synaptic or Ubuntu Software Center to complete the installation


Read rest of entry
 

Terminal Diary | techblog Copyright © 2009 Gadget Blog is Designed by jintu jacob Powered by Blogger