16 October, 2014

How to share internet connection in Ubuntu to a Raspberry Pi over LAN cable


Before we dig deep on this subject, I assume we got a Laptop connected to the internet over wifi and we are running Ubuntu on it. Now connect the Raspberry Pi (running raspbian os) to the laptop using a LAN cable. 


To share the internet connection open the Network Manager application and edit the Wired Connection.


Click on the IPv4 Settings tab and select the Method -  Shared to Other computers.

Once the above steps are complete reconnect the network to get the connectivity over the raspberry pi. 


Read rest of entry

30 September, 2014

Install Raspbian (Debian Wheezy) OS on Raspberry Pi using Ubuntu


Hope you have seen my earlier posts regarding the raspberry pi over this link.This  post is about setting up Raspberry pi with Debian Wheezy on it. I am assuming that you have a Ubuntu/Debian running laptop already available. For those who are not yet in this universe (I mean using windows) please follow this link

Get the raspbian OS image from the official website. You can get the files either by the torrent link or through the direct download link.


If your sd card already contains a linux distribution, follow the steps mentioned in this link to factory reset the card

  • Run df -h to see what devices are currently mounted.

  • If your computer has a slot for SD cards, insert the card. If not, insert the card into an SD card reader, then connect the reader to your computer.

  • Run df -h again. The new device that has appeared is your SD card. The left column gives the device name of your SD card; it will be listed as something like /dev/mmcblk0p1 or /dev/sdd1. Ideally if you are plugging your card into laptops card reader using it's adapter device label will be /dev/mmcblk0p1.On the other side if the card is connected to a usb card reader, device name shown will be /dev/sdb1 or /dev/sdc1 or /dev sdd1 etc... The last part (p1 or 1 respectively) is the partition number but you want to write to the whole SD card, not just one partition. Therefore you need to remove that part from the name (getting, for example, /dev/mmcblk0 or /dev/sdd) as the device for the whole SD card.

  • Now that you've noted what the device name is, you need to unmount it so that files can't be read or written to the SD card while you are copying over the SD image.

  • Run umount /dev/sdd1, replacing sdd1 with whatever your SD card's device name is (including the partition number).

  • If your SD card shows up more than once in the output of df due to having multiple partitions on the SD card, you should unmount all of these partitions.

  • In the terminal, write the image to the card with the command below, making sure you replace the input file if= argument with the path to your .img file, and the /dev/sdd in the output file of= argument with the right device name. This is very important, as you will lose all data on the hard drive if you provide the wrong device name. Make sure the device name is the name of the whole SD card as described above, not just a partition of it; for example sdd, not sdds1 or sddp1; or mmcblk0, not mmcblk0p1.

    cd /path/containing/extracted/OSimage/previously/downloaded

    sudo dd bs=4M if=2014-09-09-wheezy-raspbian.img of=/dev/sdd

  • Please note that block size set to 4M will work most of the time; if not, please try 1M, although this will take considerably longer.

  • The dd command does not give any information of its progress and so may appear to have frozen; it could take more than five minutes to finish writing to the card. If your card reader has an LED it may blink during the write process. To see the progress of the copy operation you can run sudo pkill -USR1 -n -x dd in another terminal. The progress will be displayed in the original window and not the window with the pkill command; it may not display immediately, due to buffering.

  • Run sync; this will ensure the write cache is flushed and that it is safe to unmount your SD card. 
  • Remove the SD card from the card reader.

     
Read rest of entry

27 September, 2014

How to remove existing OS installation and reset the size of Raspberry Pi's SD Card

To remove existing OS installation and reset the size of Raspberry Pi's SD Card we are going to use one of the simple partition editor - gparted in Ubuntu/Debian.

Insert the SD Micro SD card that may or may not contains the Raspberry Pi's operating system into your laptops card reader slot. I am assuming that you got a Raspbian OS installed on the SD card during the life of this post :).

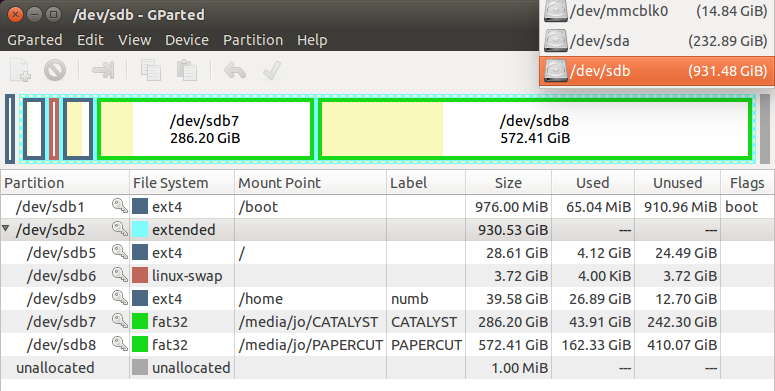
On the top right corner of the gparted, choose your SD card properly. You can identify your card using the size in Gigs(14.84GB) or the by checking for a disk name that starts with pattern - mmcblk*. If you choose wrong disk here in this menu, I will not be responsible for anything that sounds like "I lost my personal files" or "I lost my movies" or "my OS is crashed" and so on. See the below image that have the right selection.


Now unmount earch partition by right clikcing on them, if it is already mounted. Ideally the new versions of Ubuntu will mount the partitions automatically unless otherwise you tweak it to not do so.


Once the partition is unmounted, you are ready to delete it.
 
All the changes made so far will be, written to the memory device when the apply button is clicked as in below image.


Read rest of entry

How to install gparted (partition editor) on Ubuntu 14.04 LTS / Debian wheezy / Raspbian

Here is how to install one of the coolest partition editor for  Ubuntu 14.04 / Debian wheezy / Raspbian

Gparted a GUI based application that helps to work with partitions on your memory devices. It is packed with many features like
  •     Create partition tables, (e.g., msdos or gpt)
  •     Create, move, copy, resize, check, label, set new UUID, and delete partitions
  •     Enable and disable partition flags, (e.g., boot or hidden)
  •     Attempt
  •     Create space for new operating systems

GParted works with the following storage devices:
  •     Hard disk drives (e.g., SATA, IDE, and SCSI)
  •     Flash memory devices, such as USB memory sticks and Solid State Drives (SSD’s)
  •     RAID Devices (hardware RAID, motherboard BIOS RAID, and Linux software RAID)
  •     All sector sizes (e.g., devices with 512, 1024, 2048, 4096 byte sectors and more)


Update your software repository listing using the apt commands from the terminal:

sudo apt-get update


Now install gparted using the below given command

sudo apt-get install gparted


Once the installation is complete, launch gparted using the following command and provide the root credentials


sudo gparted


Read rest of entry

17 September, 2014

Unboxing Raspberry Pi B+

And raspberry pi is home yesterday... Here are some snaps  while i unboxed it.


Read rest of entry

16 September, 2014

Raspberry Pi & accessories - purchase guide in India


All the Raspberry Pi accessories are home yesterday. In India there are lot of online purchase options for raspberry pi and accessories from leading online sellers like ebay.in, amazon etc... I would like to tell you from where I collected it rather than where all it can be purchased( That will be gross, since there are whole lot of providers around here)


Raspberry Pi B+ SoC

Both these sites sell comparitively less priced B+ boards than ebay/Amazon during the time of my purchase. I chose CrazyPi and got the delivery within a week of the order.


Clear Case for B+

There are better cases available in amazon and CrazyPi.com. The one that I chose was cheaper though good looking. B+ got two LEDs on the board with red and green color. FYI, A transparent/acrylic  case will defenitely look geeky, than the clumpsy plastic case


SD card
Out of the a whole list of SDcards that Pi can run i just chose - Sandisk Ultra microSDHC 16GB Class 10 Memory Card with Adapter. If you need to know the entire list of SD cards supported by the Raspberry Pi, following page will be handy - http://elinux.org/RPi_SD_cards


USB Wifi Dongle

This is seems to be the cheapest wifi dongle that the B+ can run. Need some work around for installing the firmware for the B+, still range is almost similar to my Xperia mini's antenna.

If you are looking for some other options here is your handbook - http://elinux.org/RPi_USB_Wi-Fi_Adapters


USB BlueTooth dongle

Initially I worried whether it will get detected by the rPi, however even during the boot itself you can see the trace of this dongle getting noticed by the Pi.


HDMI cable (if your tv supports hdmi)

Get a cable that is fast and long enough. Ebay got more options than other stores


HDMI to VGA adapter (optional)
Ordinary HDMI to VGA converters dont work with the Pi. You can get one from carzyPi store that have Digital to analog signal conversion chip. This adapter is completely different from the regular hdmi vga converters available in ebay.


5V/750mA Power adapter ( aka your smartphone's charger)

If you want a dedicated power adapter, a NOKIA Lumia's power cable will be the easy option that can output 5 Volts and ~750 mA. In all other cases your smartphones charger will be the alternative.


Read rest of entry

What happened when I heard about a raspberry Pi


The enthusiast inside me was just sleeping for a while (possibly around 3 years due to the damn corporate IT culture). And technically that was the reason why there wasn't enough posts recently. Suddenly last month on a trip to Coorg with @asuthoshjg & @nikhilkv, I heared about this little nasty motherboard from @asuthoshjg. The whole reason for the raspberry pi to hit our conversation was just my concern about a 4GB SD card in dslr that will easily run out of memory before we reach Coorg via Mysore. And pi just got hooked enough into my brain that browsing about it was the first thing that I did when reached back home after a sleepless night of driving and hunger.

The one best paragraph that explains everything about the pi in their community website is added below.

The Raspberry Pi is a credit-card sized computer that plugs into your TV and a keyboard. It is a capable little computer which can be used in electronics projects, and for many of the things that your desktop PC does, like spreadsheets, word-processing and games. It also plays high-definition video. We want to see it being used by kids all over the world to learn how computers work, how to manipulate the electronic world around them, and how to program.


It was one of the interesting things that I heared recently apart from the understanding that Saturday and Sunday are holidays at my workplace (sigh - literally). The another thing that increased my anticipation was that pi was available for online purcase at lot of sites. And I started getting excited about a pocket cpu that is powered by ARM6 700 Mhz processor with 512MB RAM, 4 USB ports, ethernet port and hdmi out at 4k-5k along with accessories. The plan was to replace the  plan of purchasing a vaccum-cleaner ( countless requests from my mother since last months) with the raspberry Pi. 


The funniest part was, Pi will just improve the count of number of computers (used and unused) at my home by 4. Four is a good number, by the way. It was not the Pi alone, but it was the enthusiasm and same old interest to these kind of stuffs when i was at my college, that is coming back to home along with the Pi soon.


Hopefully another post will be ready soon in a week when I get my hands on the Pi...


Read rest of entry
 

Terminal Diary | techblog Copyright © 2009 Gadget Blog is Designed by jintu jacob Powered by Blogger