27 September, 2014

How to install gparted (partition editor) on Ubuntu 14.04 LTS / Debian wheezy / Raspbian

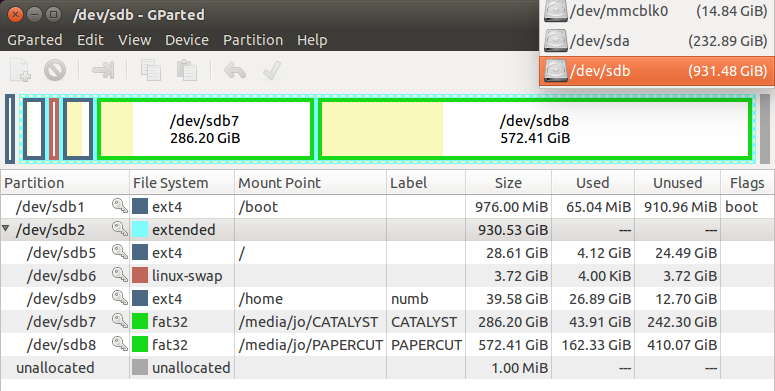
Here is how to install one of the coolest partition editor for  Ubuntu 14.04 / Debian wheezy / Raspbian

Gparted a GUI based application that helps to work with partitions on your memory devices. It is packed with many features like
  •     Create partition tables, (e.g., msdos or gpt)
  •     Create, move, copy, resize, check, label, set new UUID, and delete partitions
  •     Enable and disable partition flags, (e.g., boot or hidden)
  •     Attempt
  •     Create space for new operating systems

GParted works with the following storage devices:
  •     Hard disk drives (e.g., SATA, IDE, and SCSI)
  •     Flash memory devices, such as USB memory sticks and Solid State Drives (SSD’s)
  •     RAID Devices (hardware RAID, motherboard BIOS RAID, and Linux software RAID)
  •     All sector sizes (e.g., devices with 512, 1024, 2048, 4096 byte sectors and more)


Update your software repository listing using the apt commands from the terminal:

sudo apt-get update


Now install gparted using the below given command

sudo apt-get install gparted


Once the installation is complete, launch gparted using the following command and provide the root credentials


sudo gparted


Read rest of entry

17 May, 2011

Access the blocked websites [facebook, orkut, youtube] using free http proxy servers

Atlast that too happened. Ban  for facebook on the computer lab,  Damn proxyserver !! They first blocked youtube, then orkut, then torrents and now it's facebook's turn... Then how do a man live without all this things in such a technically overflooding world?

I can't agree with their policies... I want to talk, i want to chat and i want to tweet.. Squid proxy server was running on the network. It was powerful and configured well to block everything out of the rule. Then i started googling for a way to bring the blocked facebook onto my laptop within the same network, and found that some free http proxy servers outside the network will help me.Also port 80 (HTTP) was open, so that i can browse the internet.

What actually happens in the network when i am behind my college's proxy server is, whenever a url request for facebook comes from my browser, the proxy server which has been configured to capture such requests comes into action. But since we are allowed to browse on the internet, its clear that you can access servers other than facebook. Most of the free http proxy mechanisms work on this trick. They help you to cheat the squid server. Squid server beleive that your machine and the free proxy server  on the internet (may be in US, Europe ) are the two endpoints of communication. See the image below to see how that http proxy server loads the facebook page on your machine  [check the url area and the content area in the image]


Here the free http proxy server (faceoxy.com in image) communicate with the facebook server on behalf of you and serves the packets from the facebook within faceoxy's header. That was somewhat literally!!!  So when the squid program analyses the packets, it can not find any traces of the facebook in the source/destination address feilds of the ip packets. I am not going to the advanced details of http tunneling, another post is on its way...


List of the free and reliable http proxy servers that help you to access blocked websites such as facebook, orkut, youtube etc.. are : Though they are classified most of the sites serves facilities such as 
  • anonymous browsing
  • proxy bypassing
  • changing network location of your machine

HideMyAss.com – Free Anonymous Proxy Servers

Proxy.org – Directory of free proxy servers.

GlobalPandora – They give you a proxy address to add to your browsers netwrok settings

http://blockedsiteaccess.com/


facebook  


http://facebookoxy.com/

http://www.faceoxy.com/


youtube proxy


Megabypass

Youtubeproxy

MegaProxy 


proxybin.com
 
Another best trick that works well with these condition is the foxyproxy addon for firefox. Just install the addon for your firefox. FoxyProxy automatically switches an internet connection across one or more proxy servers based on URL patterns. Simply, it automates the manual process of editing Firefox's Connection Settings dialog. Proxy server switching occurs based on the loading URL and the switching rules you define...
Read rest of entry

14 May, 2011

Does your Gmail account hacked yesterday ??? who knows


You knows !!! Gmail is considered as one among the best email services today, so people are using it for both business and personnel usage. Then comes the issue of security that protects the mails in your inbox. Make sure that your gmail account is safe and open to you only. Google offers activity information mechanism for finding weather your gmail account is hacked or not. Its simple.., you don't need to be a geek. This post will help you to identify weather someone else is accessing your inbox.


Navigate to the bottom side of the gmail inbox. I just pinned the snapshot of mine here. Check for the line starting with the sentence 'Last account activity : x hours ago at IP x.x.x.x'. There you can find a link labeled 'Details'. Click their to see the log information on your gmail inbox and make sure that you are the only one used that account.


Make sure that the IP addresses listed are the same ones that you used. Check the country, date, time and access type also, and identify weather it matches with your usage. Once i have seen a log from a different ip address on my gmail's log. It appeared to be one from Aisanet's network. (That was a my first experience of being hacked). Later i found it was not an accidental one. This unwanted access was from an  internet cafe once i used 2-3 days before the hazard, and what really happened was i really forgot to logout from my gmail account when i quit the cafe. If you feels the same, then understand this is the right time to change your google account's password. Do it  now itself, else you may be the next victim. Changing the passwords frequently is always refered as the best methode to escape from hacks and unwanted access to your personals kept on internet...

Finding ip adress of your machine

If you dont want to go technical just visit the website tracemyip to know your ip address and related details.  


If you are a unix guy, use the ifconfig command on the terminal to know your ip. The field shown as 'inet addr' corresponding to your mode of connection (eth, wlan, ppp) is the ip.


and, If you are windows guy, use the dos command ipconfig in the command prompt window to view your ip. 


Note :
  • Ip address may not be the same for every time you connects, if you are not using a static connection.. 
Read rest of entry

10 May, 2011

Installing Ubuntu 11.04 in pendrive persistently : time for pendrive OS

What about the idea of carrying your operating system whereever you go? I am not talking about bringing your laptop everywhere you go, instead use your pendrive to carry your linux distro. Not simply the live distro, you can carry your operating system with all your configurations, favorite desktop background and personal files. We can call it as a persistent installation since the pendrive linux can not only used as a means for installing linux but also it can retain the changes you made (similar to a linux installation on a hard disk). In simple terms if you store a file on the desktop or installed any new application on the pendrive ubuntu it will be there next time you boot from that pendrive.

While carrying your operating system on a USB pendrive there are many advantages. I think the most appealing one is that you will get your favourite environment wherever you go. If you are a hardcore linux user then no doubt you will find it hard to work with a 'windows only' machine, then you can use your favorite ubuntu that boots from pendrive. Another aspect is related to the security. You can use your ubuntu on the pendrive inside an internet cafe where you can expect keyloggers or other applications that can cause security breaches. Simply your online money transactions can be made secure without the help of softwares or operating system available on a cafe.

Third advantage is somewhat geeky. You can use this pendrive to remain anonymous on the internet and hack safely. Move over many machines and many networks with your handy pendrive and diminish the possibility of tracing you with the help of MAC address and IP address.

And the practical way...

I am very much font of Ubuntu as it provides a powerful environment for application development and entertainment. So i am using the latest distribution of Ubuntu, Natty narwhal (11.04) as my pendrive operating sytem. I have tested it on a Kingston DataTraveler G3 8GB pendrive. Download the iso image of the Ubuntu 11.04 from the link here. Though there are a number of ways to make persistent installation we just use the most simplest one here. For this you need a Windows (vista/7) and application called Universal USB installer (click here to download). 


Select the Ubuntu 11.04 iso image and the pendrive from the Universal USB installer to start installing Ubuntu on to pendrive. The installer will take a few mnutes for finishing the task... Done!!! your pendrive Ubuntu is ready, restart the system and boot from the pendrive to use it...
Read rest of entry

30 November, 2010

fork bomb explained...


Don't try this @ your home ....Injurious to your computer's health, else  you will be...


Defining the fork bomb . . .

                   A fork bomb is simply a line of some characters entered into the command line of a Unix system, and when the enter key is pressed, within seconds the computer will crash... The little program we entered in to the bash shell act as a process & make multiple copies of itself, setting off a chain reaction and thus quickly exhausting the system’s resources. Most computer operating systems can be  simply crashed or at least brought to a coma stagewhen users, even those without superuser privileges, launches this 'logical bomb' that eat up all memory and CPU time. "Forkbomb" does nothing but launch two or more copies of itself upon startup. Since these copies do the same in turn, this sets off a chain reaction with an exponentially growing number of processes. A fork bomb process "explodes" by recursively  spawning copies of itself using the Unix system call fork().


Working of the 'bomb'...
  
              A process begins  execution when it's execution environment and corresponding threads are created. Before  execution the process has to take a room in the process table, which is a data structure for holding  information required by the kernel to run the process such as...

      > Process state
      > Several process IDs
      > User IDs for determining process privileges
      > Pointer to text structure for shared text areas
      > Pointer to page table for memory management
      > Scheduling parameters,  priority values
      > Timers for resource usage etc...


                A fork bomb creates a large number of processes very quickly and begins execution one after the other by seizing the process table. So whenever a free slot occurs in the process table, another copy of the bomb process enters it and start spawning new bombs. When process table becomes saturated, no new programs may start until another process terminates. Even if that happens, it is not likely that a useful program may be started since the instances of the bomb program will each attempt to take any newly-available slot themselves.


                In addition to using space in the process table, each child process of a fork bomb uses further processor-time and memory. As a result of this, the system and existing programs slow down and become much more unresponsive and difficult or even impossible to use.

see the defenition for fork bomb in wikipedia,
                In computing, the fork bomb is a form of denial-of-service attack against a computer system which makes use of the fork operation (or equivalent functionality) whereby a running process can create another running process. Fork bombs count as wabbits: they typically do not spread as worms or viruses. To incapacitate a system, they rely on the (generally valid) assumption that the number of programs and processes which may execute simultaneously on a computer has a limit.


Some bombs that you can try @ your friend's pc


Fork Bomb in windows

 Open up notepad and type the string below and and save
 it as fork.bat :


   %0|%0


 On double clicking this file,it will lead to total CPU jam 
 by opening a large no. of processes of command prompt.


In UNIX C or C++:


 Compile and execute the following C/C++ code snippet
 in Unix to understand (???) the bomb...

#include <unistd.h>
int main(void)
{
    for(;;)      //for(;;) or while(1) makes an infinite loop
    fork();
    return 0;
}


Bash Shell Fork Bomb


Following is the most coolest one i had ever seen. Take the bash terminal and just type in the following code....

   : (){ : |:& };:

This code is the elegant and most beautiful example of a fork bomb.


:()       _  define ':' , like a function call
{         _  beginning of what to do when we say ':'
    :      _  load another copy of the ':' function into
               memory...
    |      _  ...and pipe its output to...
    :      _  ...another copy of ':' function, which has to be
               loaded into memory (therefore, ':|:' simply gets 
               two copies of ':' loaded whenever ':' is called)
    &     _  disown the functions, that is if the first ':' is
               killed, all of the functions that it has started
               should NOT be auto-killed...
}         _  end of the definition of ':'
;          _  Having defined ':', like in structures etc... we
               should now...
:          _  ...call ':', initiating a chain-reaction: each ':' will
               start two more.


Simply the above function is the same as the code below

forkbomb(){ forkbomb|forkbomb & } ; forkbomb


How to get out of the bomb . . .
             One may have to reboot the system to resume its normal operation destroying all running copies of it. Trying to use a program to kill the rogue processes normally requires creating another process — this is  an impossible task if the host machine has no empty slots in its process table, or no space in its memory structures. Furthermore, as the processes of the bomb are terminated (for example, by using the kill command), process slots become free and the remaining fork bomb threads can continue reproducing again, either because there are multiple CPU cores active in the system, and/or because the scheduler moved control away from kill(8) due to the time slice being used up.


A simple solution is that we can stop (“freez”) the bomb's processes, so that a subsequent kill/killall can terminate them without any of the parts re-replicating due to newly available process slots:


killall -STOP bombprocess
killall -KILL  bombprocess


...Bye till the fire and smoke settles...
Read rest of entry

05 October, 2010

Copying Remote Files with scp


To use scp to transfer files, the SSH service (usually the sshd server daemon) must be running on the remote system. Here are some examples of useful scp commands:


$ scp myfile francois@server1:/tmp/ 
Password: ******
Above code copies myfile to server1


$ scp server1:/tmp/myfile 
Password: ******
Copy remote myfile to local working directory. Use the -p option to preserve permissions and timestamps on the copied files:

$ scp -p myfile server1:/tmp/If the SSH service is configured to listen on a port other than the default port 22, use -P to indicate that port on the scp command line:

$ scp -P 12345 myfile server1:/tmp/
 
Connect to a particular port.To do recursive copies, from a particular point in the remote file system, use the -r option:

$ scp -r mydir francois@server1:/tmp/ 
Copies all mydir to remote /tmp .Although scp is most useful when you know the exact locations of the file(s) youneed to copy, sometimes it’s more helpful to browse and transfer files interactively.

Read rest of entry

29 September, 2010

I'm Feeling Lucky in Google

The I'm Feeling Lucky button seen on google's home page is a feature that leads directly to the top-ranked page corresponding to your search keyword. You can avoid the search results page in cases you know the top-rated pages corresponding to your search. For example, you may need to go twitter's home, you only need to do is: type twitter in google's search box and then press the I' feeling lucky button. Then google will automatically redirect to www.twitter.com instead of showing the search results.

Adventures with I'm Feeling Lucky button

Go to www.google.com and try the following keywords in your search box and click the I'm Feeling Lucky button to see the craziest and awesome things in the google... You will be stunned.....

  • Google Hacker 

  • Google Pacman

  • Google Gravity

  • Google Sphere

  • Epic Google

  • Rainbow Google

  • Google Mirror

  • Google Loco

  • Google Gothic

  • Google Easter Eggs

Among the above searches gravity, pacman and hacker are the most awesome 


Read rest of entry

27 September, 2010

How to wipeout your hard disk perfectly in Ubuntu


Here is a command shread which can be used to in bash terminal of Ubuntu to wipeout your harddisk completely without leaving any chances for further recovery. Please dont try it unless otherwise you dont have no other use with your current system...

$ shread -v -n 1 -z /dev/hda


Options


-f, --force
       change permissions to allow writing if necessary

       -n, --iterations=N
       Overwrite N times instead of the default (25)

       -s, --size=N
       shred this many bytes (suffixes like K, M, G accepted)

       -u, --remove
       truncate and remove file after overwriting

       -v, --verbose
       show progress

       -x, --exact
       do not round file sizes up to the next full block;

       this is the default for non-regular files

       -z, --zero
       add a final overwrite with zeros to hide shredding
Read rest of entry

12 May, 2010

How to Mount Your Partitions Permanently in Ubuntu

                                    Linux machines are very much aware in the case of security, but this extra security may sometimes become a headache for simple linux users. For example, if u have separate partitions or hard drives (for your backup, music collection or photo collection), every time you boot up, you have to mount those when required, providing a password which is sometimes very much irritating. The time-saving solution is to mount such media permanently. There are two steps in this process. Firstly to tell Ubuntu where to find the mount and where you want it mounted. Secondly, to create the folder within Ubuntu's recognised file structure to house the mounted media. After you perform this configuration, your backup folder on a secondary disk can be accessed from within your /home/username folder.

Tell Ubuntu Mount & Local Associated Folder Locations 
Open the fstab file that controls your mounts:-
 
sudo gedit /etc/fstab

Find out the name of partition that you are planning to mount  by issueing the following command. It lists recognized partition tables

sudo fdisk -l 

At the bottom of the file, for each partition or drive you wish to mount forever, paste:-
 
/dev/sdb1 /mnt/mydrives 
ext3  users,noatime,auto,rw, nodev,exec,nosuid 0 0

Read man page of mount for more details
 
• /dev/sdb1 - media to mount
• /mnt/mydrives - location to mount to with a friendly name
• ext3 - filesystem
• users - allow all users, alternatively use user
• noatime - don't waste resources recording last access time or, if you  
                                                                          want this info, change to atime
• auto - mount on boot
• rw - read write access
• nodev - prevents unauthorized device mounts
• exec - execute programmes from disk
• nosuid - do not allow set-user-identifier
• 0 - dunno, probably should though
• 0 - ditto
 
Save the file when you’re done. Check out the figure if you have doubts


Create the Local Folder to House Mounted Media

Now create the folder location for the mount. So, in this example:-

sudo mkdir /mnt/mydrives

Reboot your system to see the Ubuntu automatically mounting the device @ boot time... In Nautilus look for /mnt/mydrives. You can create a launcher for easier access if needed.
 
Symbolic Link to Permanent Mounted Partition

Here's an optional third step for simplifying the navigation. Rather than having to navigate each time to your /mnt folder to find your media, you can shortcut to there from, say, your /home/username folder. An easy way to do this is to open nautilus twice, once navigating to your /mnt folder and, with the other, to your /home folder.
Now, holding down the Ctrl and Shift keys, simply drag the newly mounted media file accross to your /home/username folder which you can see in your /home folder. From now on, when you navigate to your /home/username folder, click on that symlink to  jump  to the contents of the mounted partition. If you delete a file from a symlink in your /home/username folder, you really really do delete the original file.


Read rest of entry

Speed up the startup and shutdown process in Windows XP : registry tweak

Let's try some trick for increasing the speed of booting and shutting down of Windows XP through the group policy editing. 

Open the RUN command using Windows+ R key combination or from the  start menu and type notepad.

In NOTEPAD, copy del C:windowsprefetch tosboot-*.*/q

And save it as ntosboot.bat in your computer

Again open the RUN command and type gpedit.msc 

Click on the COMPUTER CONFIGURATION in the left side pane , under that double click WINDOWS SETTINGS and then double click on the  scripts in the  right pane


Again Double Click on the SHUTDOWN in the right window. Then click the  ADD button and then BROWSE to select the saved file ntosboot.bat and open it. (shown in figure)


Choose OK and APPLY , Once again click OK and then exit.

Now open the device management window. Take the RUN prompt and type in as  devmgmt.msc

A new window will open under that double click on IDE ATA/ATAPI controllers. Right Click on Primary IDE Channel to select properties
(Shown in the figure)


Choose the tab called ADVANCED SETTINGS then click on the device 0 or 1, The device contain device type which is not highlighted and chose none in the place of autodetect and Click OK


Now select Secondary IDE Channel and select properties and repeat the process as done above.
 
That's all  for the time being. Just restart your system to see the changes.

Read rest of entry

08 May, 2010

Important RUN commands for Windows users

             Following are the important run commands that can be used easily for starting some programsin Windows.  To open the run dialog box press the  Windows+R key or goto start and then run.   

      Accessibility Controls  -  access.cpl
      Accessibility Wizard     – accwiz
      Add Hardware - Wizardhdwwiz.cpl
      Add/Remove Programs - appwiz.cpl
      Administrative Tools control – admintools     
      Adobe Acrobat (if installed) – acrobat
      Adobe Photoshop (if installed)- photoshop
      Automatic Updates - wuaucpl.cpl

      Bluetooth Transfer Wizard – fsquirt

      Calculator – calc
      Character Map – charmap
      Check Disk Utility – chkdsk
      Command Prompt – cmd
      Computer Management - compmgmt.msc
      Control Panel – control

      Date and Time Properties - timedate.cpl
      Device Manager - devmgmt.msc
      Disk Cleanup Utility- cleanmgr
      Disk Defragment- dfrg.msc
      Disk Management- diskmgmt msc
      Disk Partition Manager- diskpart
      Display Properties- control desktop

      Event Viewer- eventvwr.msc
    
      Files and Settings Transfer Tool- migwiz
      Findfast- findfast cpl
      Firefox (if installed)- firefox   
      Folders Properties- control folders
  
    Fonts- control fonts
     
      Group Policy Editor (XP Prof)- gpedit.msc

      Help and Support- helpctr
      HyperTerminal- hypertrm

      Indexing Service- ciadv.msc
      Internet Explorer- iexplore
      Internet Setup Wizard- inetwiz
      Internet Properties- inetcpl.cpl

                 try the following on command prompt also if you see nothing

      IP Configuration (Display Connection Configuration) - ipconfig/all 
      IP Configuration (Display DNS Cache Contents)- ipconfig /displaydns
      IP Configuration (Delete DNS Cache Contents)- ipconfig /flushdns
      IP Configuration (Release All Connections)- ipconfig /release
      IP Configuration (Renew All Connections)- ipconfig /renew


      Keyboard Properties - control keyboard


      Logs Out Of Windows - logoff    


      Microsoft Excel (if installed) – excel
      Microsoft Frontpage (if installed)- frontpg
      Microsoft Movie Maker – moviemk
      Microsoft Paint – mspaint
     
Microsoft Powerpoint (if installed)- powerpnt
      Microsoft Word (if installed)- winword
      Mouse Properties - control mouse
     
      Nero (if installed)- nero
      Network Connections - ncpa.cpl
      Network Setup Wizard - netsetup.cpl
      Notepad – notepad
      
      On Screen Keyboard – osk
      Outlook Express – msimn


      Password Properties - password.cpl
      Performance Monitor - perfmon.msc
      Phone and Modem Options - telephon.cpl
      Phone Dialer – dialer
      Power Configuration - powercfg.cpl
      Printers and Faxes - control printers
      Printers Folder – printers
      Registry Editor – regedit
      Remote Desktop – mstsc
      Removable Storage - ntmsmgr.msc
    
      Scanners and Cameras - sticpl.cpl
      Scheduled Tasks - control schedtasks
      Security Center - wscui.cpl
      Shared Folders - fsmgmt.msc
      Shuts Down Windows – shutdown
      Sounds and Audio - mmsys.cpl
      System Configuration Editor - sysedit
      System Configuration Utility - msconfig
      System Properties - sysdm.cpl

    
      Task Manager – taskmgr
      Telnet Client – telnet
    
      User Account Management- nusrmgr.cpl
      Utility Manager – utilman
    
      Windows Backup Utility (if installed)- ntbackup
      Windows Explorer – explorer
      Windows Firewall- firewall.cpl
      Windows Magnifier- magnify
      Windows Media Player – wmplayer
      Windows Messenger – msmsgs
      Windows Picture Import Wizard (need camera connected)- wiaacmgr
      Windows System Security Tool – syskey
      Windows Update Launches – wupdmgr
      Wordpad – write
Read rest of entry

Registry hack : Speed up internet in Windows

In Windows the Microsoft uses a good amount of your internet bandwidth for Windows Updates. Lets do the following registry edit to avoid this bandwidth sharing.

Follow the steps below :

Go to Start, open Run and type gpedit.msc, then enter. This will open the group policy editor.

Navigate to Local Computer Policy / Computer Configuration / Administrative Templates / Network / QOS Packet Scheduler.

Now, Click QOS Packet Scheduler and then double click Limit Reservable Bandwidth. You will see that is not configured. But the truth is Under ‘Explain’ tab. By default, Microsoft reserves 20% of the bandwidth. But you can change this setting.

ENABLE reservable bandwidth, then set the bandwidth limit to 0%.

Thatz all the hack. Now microsoft reserves 20% of 'nothing'
Read rest of entry

02 May, 2010

Hacking the cd command

                                                                                                               
The cd command is a bash command in linux is meant for changing the directory in a terminal environment. This post is about a hacking the cd comment.

There is an environment variable called PATH related to the cd command. When you type a command, your system looks through all the directories defined in the PATH environment variable until it finds the command. If it doesn't find the command by the time, it tells you it can't find the file. There's a similar environment variable called CDPATH. Let's use the CDPATH for the tweak.

The basic syntax of cd command is


$ cd somewhere

We can use this CDPATH to avoid typing an entire path of the frequently accessed directories..
Here's how it works.

/home/blogger/Documents/nw/folder1
/home/blogger/Documents/nw/folder2
/home/blogger/Documents/nw/folder3
Here's what you want to do. You want to be able to jump right to the folder2 directory without having to type the entire path. Here's how to set the CDPATH environment variable so that you can do that:

$ export CDPATH=:.:/home/blogger/Documents/nw

This command does not include any of the chapter directories in the CDPATH. That's because you want the CDPATH to define the directory immediately above the directory you want to find. Remember, the system searches the directories listed in the path for the contents you specify on the command line. The argument folder2 is what you're looking for. folder2 exists in the directory /home/blogger/Documents/nw, so that is the directory you want to include in your search CDPATH.

If you need to access the directory folder2, you only need to type this


 $ cd folder2

The command should take you immediately to the directory /home/blogger/Documents/nw/folder1

The problem ???

Suppose you also created the following directories according to the same pattern mentioned earlier:

/home/blogger/Documents/internet/folder1
/home/blogger/Documents/internet/folder2
/home/blogger/Documents/internet/folder3

Naturally, you have to add a new path to your CDPATH environment variable:


$ export CDPATH=:.:/home/blogger/Documents/nw:/home/blogger    
                                                                                           /Documents/internet  

As with the PATH environment variable, you separate different search paths with a colon. The system searches through each path from left to right.

Now issue this command:

$ cd folder2

The problem is that, it puts you in the same place as before, /docs/pub//home/blogger/Documents/nw/folder3. That is not what you expected or desired. But it happened because the cd command searches the CDPATH environment variable paths from left to right. It searched the linuxhacks location first and found folder2. So, that's where it assumed you wanted to go. 

The Solution

One way to avoid the problem described earlier is to define the CDPATH in this way:

$ export CDPATH=:.:/home/blogger/Documents/

If you want to get to folder of internet, you simply type the following:

$ cd internet/folder2


Another cd Trick
This is one among the simplest of all tricks for cd, yet few people know of it. Suppose you are working in the directory /home/blogger/Documents/nw and then you change to the directory /usr/X11R6/lib/X11/fonts/TrueType. You can jump back to the previous directory simply by typing the following:

$ cd  -

This simple command returns you to the last directory you were using before you changed to the current one.

Read rest of entry
 

Terminal Diary | techblog Copyright © 2009 Gadget Blog is Designed by jintu jacob Powered by Blogger