31 May, 2011

Downloading online flash games and playing it offline in ubuntu 11.04

Flash games are always the right option whenever you feel bored and frustrated sitting infront of pc. Here is a cool trick for downloading all your favorite flash games from any websites that we play usually online. Along with this i am just including the installation of a flash player for playing the .swf files we are going to download ( a browser installed with flash plugin is always enough, though just use it... ).

Usually all the flash games are embedded in the html page so that the browser first caches and loads the application. So the trick to find out the correct url of the .swf file (of the game) varies from website to website.. Dont worry we will go through some eye popping tricks :P

Installing swf player in ubuntu
- - - - - - - - - - - - - - - - - - - - - - - - - - - -
Install swfdec-gnome package with your terminal as follows. U can use synaptic or Ubuntu software centre to install it.  


$ sudo apt-get install swfdec-gnome
 

#   Catching the fish           <------ geeky way
-----------------------------------


Now it is the time to find a cool flash game that you call 'addiction'. For the timesake i am taking the famous game called 'appleshooter'. You can find it on the officegamespot website. Wait till the browser loads the game. Now just take the source code of the page using View => Page Source from the browser (or hit Ctrl + U). In the source page find the pattern ".swf" (Hit Ctrl + F and type .swf).


If you find this pattern as a part of a url then that is the original location of the swf file which we see embedded in the html page. Then copy paste the url ending with .swf on a new tab on the browser to load that game alone. If you dont get a url, we need to use some kind of guess work to find it out.
 

Here i am pinning the screenshot of page source of the appleshooter game on officegamespot website. They dont uses direct url to the .swf file in the page source.


I guessed the url to the .swf file from the above picture from this field <a href="arrow_shooter_03.swf" .....> and tried replacing the tail part of the url,  


http://officegamespot.com/officegames/appleshooter.htm 
with  
http://officegamespot.com/officegames/arrow_shooter_03.swf 
Hi hi, that worked !!! the flash game alone loaded in the browser.

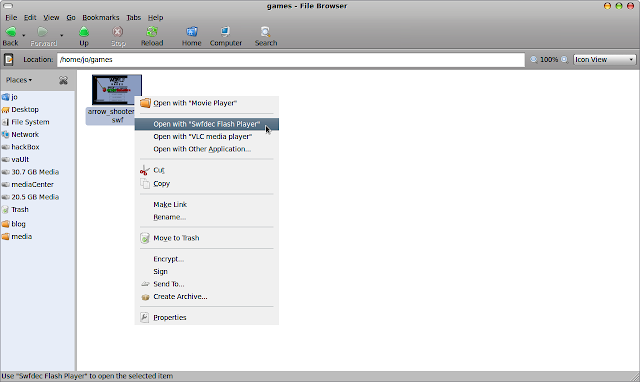
Now save the swf file to your machines hard disk for using it offline. For this just go File > Save Page As from the browser itself. So we have done it almost, whenever you want to play the game just go to that folder and open the file with swfdec flash player.


#   catching the fish          <-------- firefox guy 1
----------------------------------


Here is another trick to findout the url to the .swf file. After the browser loads the game completely, open a new browser tab and type about:cache?device=disk in the address bar and hit the enter key. Now Find the pattern .swf file in this page. Copy the url of the one that is the flash game among the urls matchin the search for .swf pattern. Open another tab and paste the url (to .swf file) to load the swf application alone in the browser. Use File > Save File As to save it to your hard disk. Later you can play the game by opening the downloaded swf file with swfdec player or with any web browsers...


#   catching the fish        
<------- firefox guy 2
----------------------------------

Another methode to get a copy of the .swf file of the flash game is to search on the browser cache for the file. You shold have to load the game on the browser to make this trick work. After loading the game completely in the firefox browser (no need to play till the last level to get the file completely !!), open a new tab and type about:cache in the address bar and hit the enter key. 


Copy paste the value of Cache Directory under Disk Cache Device to the terminal after typing nautilus.

$ nautilus /home/jo/.mozilla/firefox/tu9q54ls.default/Cache

Then the cache directory will open up. Just sort the items by Modificaton date and you can find the .swf file among the recent files. Copy it from the cache to some other directory, other wise the file will be lost when the browser tab is closed or loaded with some other pages. Now open it with the swfdec flash player to play it anytime like a standalone application..

   
#
  catching the fish   
<------- for the lazy guys
---------------------------------
If you are too lazy to spend time on above tricks, then there is an option... Use the google's search engine to find the swf file for you, so that you can just download and play it. Just type in the search box like this pattern without quotes 'appleshooter filetype:swf'.


Copy the direct url to the swf file from any of the search result. Load it in a new tab. Save it using the browser itself. You can also use a terminal command called wget to download the files.

$ cd your/games/directory
$ wget http://vc02.free.fr/media/kangg/kang.swf


Hope you got the game, now play it ...


and Hope you like the post !  Comment on !! share your ideas ....!!!
Read rest of entry

20 May, 2011

Setting up local dns cache and public dns address for "lightning" speed browsing in Ubuntu


When it comes to internet, reasonable speed is always an uncomprimisable thing. That may be a crucial reason for making you sit infront of your machines for hours and days. So the lightning speed can be achieved with your ubuntu box in two ways. They are 
  • Use faster and free domain name servers like google's pubic dns or OpenDNS (first throw the one provided by your service provider). Hope you will check one of my past article written in Crack Bytez.

  • Maintain a local dns cache in your machine itself.  So that you can do a good amount of address resolution for frequently used websites within your machine itself, and that saves a reasonable amount of time.

Here i am planning to bring both of these techniques together in a simple manner. Though there are many applications for local DNS caching in ubuntu [ such as dnsmasq, pdnsd, bind9 ] are available, bind9 seems to be a good option for me...

Starting with BIND9  DNS server in Ubuntu

Bind9 (Berkly Internet Naming Daemon)  is the most widely deployed DNS server. Bind9 is available in the ubuntu main repository itself. So you don't need to add some additional repository for installing it. Use the following command line or search for 'bind9' in Synaptic package manager to install it. 

$ sudo apt-get install bind9

Bind9 allows different type of configurations, and our point of view is on configuring it as a caching server. In this configuration BIND9 will find the answer to name queries and remember the answer for the next query. This can be useful for a slow internet connections especially based on mobile internet. By caching DNS queries, you will reduce bandwidth and (more importantly) latency. It increase network performance by caching IP addresses of commonly visited websites instead of retrieving them from the public DNS servers maintained by ISPs at each request.

Configuring the BIND server 

#  First you have to set your machine's address (127.0.0.1) itself as the primary dns address.  This can be done with the help of Network manager or by editing the /etc/resolv.conf file in your ubuntu box. Check the screenshot below..

  • using Network manager:: select the connection and click on the edit. Then choose the IPv4 settings tab and add 127.0.0.1 to the DNS servers field.

  • editing the resolv.conf file:: If you are using DHCP then you may have to edit the resolv.conf file every time you connect to the internet to make bind work properly.


Now change the bind configuration file to add some external DNS servers for resolving a new address that is not cached on your local cache at that time. If you are not adding an external dns server, then it will not be possible to resolve a new address request comes from the browser.  Here i recommend google's public dns or OpenDNS addresses to add in the BIND configuration file. This servers may be sometimes faster and reliable than your ISP's Domain Name Servers. You can find the best DNS server applicable for you by checking in this post. Here is how i have added it

#  First open the file 'named.conf.options

$ sudo gedit /etc/bind/named.conf.options

#  Now uncommend the section 'forwarders'. Replace the '0.0.0.0' with the dns server address applicable to you (Check the figure).

#  Restart  the BIND server:

$ sudo /etc/init.d/bind9 restart


Thatz it. We are almost done. Now use the dig command to see the change in speed. If you "dig" a domain name multiple times you should see a drastic decrease in query time: between the first and second query. This is due to the server caching the query. See what happened when i dig twitter from my terminal three times concecutively. See the change in the Query time.

$ dig twitter.com


Time is up. Go Applications > Internet > firefox and experience the lightning speed...

Read rest of entry

18 May, 2011

Download your facebook account entirely [let's have a copy on the harddisk too]

Facebook now provides a feature to download all the information that you have put on your account so far. This is a copy of all the personal information you've shared on Facebook. Many of the photos might not be there in your local harddisk. So this will help you to download all the informations that you shared, and someone tagged you. Also incase your account is blocked by any reasons it isn't possible to take  back all the data at that instant. So better is to download your informations frequently so that you can avoid loosing your favourites...

When you download the information you get following list of information that you have shared on Facebook.
  • Your profile information (e.g., your contact information, interests, groups)
  • Wall posts and content that you and your friends have posted to your profile
  • Photos and videos that you have uploaded to your account
  • Your friend list
  • Notes you have created
  • Events to which you have RSVP’d
  • Your sent and received messages
  • Any comments that you and your friends have made on your Wall posts, photos, and other profile content

At present it is not possible to select particular items from the above list, entire information will be completely downloaded.


Steps to download the facebook information

Select Account > Account Settings . Navigate to the bottom of the page and click on the link labelled as learn more corresponding to Download your Information . Check the figure below. 
You will be redirected to another page where it asks for your facebook password. Press the continue button after providing the password information to move on to the next page.  

Click on the Download Now button to begin the download.


After downloading you will get a zip file.  Extract it in some directory and click on the index.html to view the contents.

Read rest of entry

17 May, 2011

Access the blocked websites [facebook, orkut, youtube] using free http proxy servers

Atlast that too happened. Ban  for facebook on the computer lab,  Damn proxyserver !! They first blocked youtube, then orkut, then torrents and now it's facebook's turn... Then how do a man live without all this things in such a technically overflooding world?

I can't agree with their policies... I want to talk, i want to chat and i want to tweet.. Squid proxy server was running on the network. It was powerful and configured well to block everything out of the rule. Then i started googling for a way to bring the blocked facebook onto my laptop within the same network, and found that some free http proxy servers outside the network will help me.Also port 80 (HTTP) was open, so that i can browse the internet.

What actually happens in the network when i am behind my college's proxy server is, whenever a url request for facebook comes from my browser, the proxy server which has been configured to capture such requests comes into action. But since we are allowed to browse on the internet, its clear that you can access servers other than facebook. Most of the free http proxy mechanisms work on this trick. They help you to cheat the squid server. Squid server beleive that your machine and the free proxy server  on the internet (may be in US, Europe ) are the two endpoints of communication. See the image below to see how that http proxy server loads the facebook page on your machine  [check the url area and the content area in the image]


Here the free http proxy server (faceoxy.com in image) communicate with the facebook server on behalf of you and serves the packets from the facebook within faceoxy's header. That was somewhat literally!!!  So when the squid program analyses the packets, it can not find any traces of the facebook in the source/destination address feilds of the ip packets. I am not going to the advanced details of http tunneling, another post is on its way...


List of the free and reliable http proxy servers that help you to access blocked websites such as facebook, orkut, youtube etc.. are : Though they are classified most of the sites serves facilities such as 
  • anonymous browsing
  • proxy bypassing
  • changing network location of your machine

HideMyAss.com – Free Anonymous Proxy Servers

Proxy.org – Directory of free proxy servers.

GlobalPandora – They give you a proxy address to add to your browsers netwrok settings

http://blockedsiteaccess.com/


facebook  


http://facebookoxy.com/

http://www.faceoxy.com/


youtube proxy


Megabypass

Youtubeproxy

MegaProxy 


proxybin.com
 
Another best trick that works well with these condition is the foxyproxy addon for firefox. Just install the addon for your firefox. FoxyProxy automatically switches an internet connection across one or more proxy servers based on URL patterns. Simply, it automates the manual process of editing Firefox's Connection Settings dialog. Proxy server switching occurs based on the loading URL and the switching rules you define...
Read rest of entry

16 May, 2011

Download your gmail inbox to harddisk for offline usage in Ubuntu

I don't know when i have started using gmail. But now, i am wondering why it doesn't makes me bored eventhough i am watching the same appearence and 'looks of gmail' for more than five years. Gmail is something more than the 'appearences' since it provides a secure and fully fledged mechanism to communicate your personal and business affairs. That may be the reason why i haven't googled for something like 'best online email service' for those past years where i experienced the power of Gmail. 

Here i am introducing an application named 'Gmail Backup' that helps you to download and back up all your mails from the Gmail inbox to your computer's hard disk. The collection of mails that you backed up can be viewed and read offline with the help of some text editors, browsers or email applications such as thunderbird without going online...

 
Setup and Installation

Since the Gmail Backup is a python based application you may need some additional python libraries for running the gui. So first  install the latest version of wxPython on your ubuntu box with the help of Synaptic package manager or apt. The installation  with apt pacakge manager using terminal is given below.

#  First import the key into your apt's list of trusted keys (we both hate warnings !! and this is how we remove the warnings about the digital signature)  

$ curl http://apt.wxwidgets.org/key.asc | sudo apt-key add - 


# Add the following lines to your /etc/apt/sources.list file. Change 'natty' to the suitable one if you are using an ubuntu distribution other than Natty narwhal. 

  #wxWidgets/wxPython repository at apt.wxwidgets.org
  deb http://apt.wxwidgets.org/ natty-wx main
  deb-src http://apt.wxwidgets.org/ natty-wx main

  
#  Run the this command to update your local copy of the packages meta-data. 

$ sudo apt-get update
 

# Now install the wxPython packages using the following commands.

  $ sudo apt-get install python-wxgtk2.8 python-wxtools wx2.8-i18n libwxgtk2.8-dev libgtk2.0-dev

The packages libwxgtk2.8-dev and libgtk2.0-dev may need to be installed if a 3rd party application requires wxWidgets when building from source.
 
# Inorder to access the gmail with such an application you need to enable the IMAP option on the gmail settings. Go to your gmail inbox with your browser. Navigate to the Forwarding and POP/IMAP section on the gmail settings page to enable the IMAP as shown in the figure.


Now download the gmail Backup application from the link here. Extract the zipped file. Using your terminal navigate to the location of the zipped file.
 
#  Use the ls command to list all the files 

$ ls -l *.sh 

Run the file named gmail-backup-gui.sh to start the gui interface of the Gmail Backup application shown below.

$ ./gmail-backup-gui.sh


# Enter the required information and press the backup button to start downloading the mails. You can view the mails with the help of a browser/text editor/email application[kmail,mozilla thunderbird]. All the mails are stored in the specified folder seperately as eml files.
Read rest of entry

14 May, 2011

Does your Gmail account hacked yesterday ??? who knows


You knows !!! Gmail is considered as one among the best email services today, so people are using it for both business and personnel usage. Then comes the issue of security that protects the mails in your inbox. Make sure that your gmail account is safe and open to you only. Google offers activity information mechanism for finding weather your gmail account is hacked or not. Its simple.., you don't need to be a geek. This post will help you to identify weather someone else is accessing your inbox.


Navigate to the bottom side of the gmail inbox. I just pinned the snapshot of mine here. Check for the line starting with the sentence 'Last account activity : x hours ago at IP x.x.x.x'. There you can find a link labeled 'Details'. Click their to see the log information on your gmail inbox and make sure that you are the only one used that account.


Make sure that the IP addresses listed are the same ones that you used. Check the country, date, time and access type also, and identify weather it matches with your usage. Once i have seen a log from a different ip address on my gmail's log. It appeared to be one from Aisanet's network. (That was a my first experience of being hacked). Later i found it was not an accidental one. This unwanted access was from an  internet cafe once i used 2-3 days before the hazard, and what really happened was i really forgot to logout from my gmail account when i quit the cafe. If you feels the same, then understand this is the right time to change your google account's password. Do it  now itself, else you may be the next victim. Changing the passwords frequently is always refered as the best methode to escape from hacks and unwanted access to your personals kept on internet...

Finding ip adress of your machine

If you dont want to go technical just visit the website tracemyip to know your ip address and related details.  


If you are a unix guy, use the ifconfig command on the terminal to know your ip. The field shown as 'inet addr' corresponding to your mode of connection (eth, wlan, ppp) is the ip.


and, If you are windows guy, use the dos command ipconfig in the command prompt window to view your ip. 


Note :
  • Ip address may not be the same for every time you connects, if you are not using a static connection.. 
Read rest of entry

11 May, 2011

6 best practises for a good kowledge researcher on internet

The century where we defined the meaning of 'www' and 'internet' were over. Now these technologies turned to be the best flavour tied up with our life. A child even before he stands up for the first time in his life comes in touch with the latest flavour of technology by watching tv and playing with the mobile phone. So the internet is being a big phenomenon.

Internet offers the best services that connect and educates people across the world. Majority of the internet users utilizes internet as a tool for social networking and chatting only. While internet remains the best knowledge pool, we must follow some good practises to utilize and extract the best from it. Worldwide acceptance of free software and the sharing concepts might have played the key role in fuelling the era of blogs and forums. 

I have always amazed at seeing the number of peple writing and contributing on free software platforms like ubuntu. Everyday how many tweets fly over the internet carrying links?? it might be millions..We have to break the rule that 'internet is nothing but a Goooooooogle search'. As the digital media is rapid and feature rich than the traditional and conventional printed media, we should follow a proper guideline for using it in better manner. My intention is nothing but introducing before you the best practises for online reading and keeping always in touch with the latest technology through this blog post.


1. Dont be the usual guy always :)

Find a little time for spending with the latest stuff in your favourite blogs and webpages other than facebook and myspace. Let's close the tabs of your favourite social networking sites while you read. Dont mix up the everything togeteher, instead find time for everything. You can make a better environment for learning, only if you have the gutz to do that...


2. Subscribe the best (its free of cost) 

Whenever you move over an interesting and 'followable' web page, don't forget to use the subscribe button to subscribe to the feeds from that blog. Feeds are the topics that are written in that blog or web page that will be available on your feed reader (such as google reader) and can be organized as you wish. If you are using an online feed reader service, the advantge is that you don't have visit your favourite blogs individually everytime, every stuff will be available on the feed reader's inbox. That makes all your faourite contents from many web pages under a single roof. Its better to use an online feed reader rather than bookmarking the stuffs with your browser. Bookmarks will be lost on a system crash unless otherwise it is not backed up properly, and it is better for websites rather than blogs.

I have been sticking on to the Google reader for a while since it provides better services to organize and manage my feeds. It have features like slideshow, collections and more to make reading attractive and easy.   


3. Inbox is not your waste box !


Many of the blogs and websites will allow you to subscribe contents through email also, along with the feed subscription. Think before you subscribe via email weather the contents are so important to sit on your inbox. Otherwise your inbox will flood with unimportant mails of blog subscriptions and that may be the reason for losing your job because of unnoticing the appointment order. It took almost one and half weeks for me to remove the unimportant subscriptions from my email inbox. I was forced to do it when my inbox crossed 4000 mails and lion's share of the subscriptions are 3-4 years old and are unread...


4. Comment on !! are you dead???


When you move over a blog post, just take a pause and comment if you have something to add up with the content described in the post. Most of the blogs allow the commenting feature to make discussions live. Remember your comments are always valuable to and useful for the next guy visiting the same post. I usually check for the comments area of the blogposts before reading the content of the post. My intention is nothing but to watch the feedback given by other readers. Soemtimes the trick given on that post might not work and may be the same is commented by someone. So a hawk eye view on comments section will let you decide weather to spend time on reading the post.


5. Share the spirit !!


Whenever you finds an interesting content don't forget to share that link to your friends also. Major social networking sites (twitter, facebook) and online bokmarking sites (delicious,digg) provides facilities to share the links. While sharing a link try to encourage your friends to read that post also. I think youtube videos are shared more than any other links in most of the social networking sites...


6. Watch it on your desktop


 You can use applications for reading the feeds in on your desktop. In a better way. Many feed reader application and widget are available. Google gears can be used to read contents offline from your blog. Some of the applications for Ubuntu distributions are Akregator, Yarssr, Liferea, Blam ...


Hope u like the post. Bye till the next one !!

Read rest of entry

10 May, 2011

Installing Ubuntu 11.04 in pendrive persistently : time for pendrive OS

What about the idea of carrying your operating system whereever you go? I am not talking about bringing your laptop everywhere you go, instead use your pendrive to carry your linux distro. Not simply the live distro, you can carry your operating system with all your configurations, favorite desktop background and personal files. We can call it as a persistent installation since the pendrive linux can not only used as a means for installing linux but also it can retain the changes you made (similar to a linux installation on a hard disk). In simple terms if you store a file on the desktop or installed any new application on the pendrive ubuntu it will be there next time you boot from that pendrive.

While carrying your operating system on a USB pendrive there are many advantages. I think the most appealing one is that you will get your favourite environment wherever you go. If you are a hardcore linux user then no doubt you will find it hard to work with a 'windows only' machine, then you can use your favorite ubuntu that boots from pendrive. Another aspect is related to the security. You can use your ubuntu on the pendrive inside an internet cafe where you can expect keyloggers or other applications that can cause security breaches. Simply your online money transactions can be made secure without the help of softwares or operating system available on a cafe.

Third advantage is somewhat geeky. You can use this pendrive to remain anonymous on the internet and hack safely. Move over many machines and many networks with your handy pendrive and diminish the possibility of tracing you with the help of MAC address and IP address.

And the practical way...

I am very much font of Ubuntu as it provides a powerful environment for application development and entertainment. So i am using the latest distribution of Ubuntu, Natty narwhal (11.04) as my pendrive operating sytem. I have tested it on a Kingston DataTraveler G3 8GB pendrive. Download the iso image of the Ubuntu 11.04 from the link here. Though there are a number of ways to make persistent installation we just use the most simplest one here. For this you need a Windows (vista/7) and application called Universal USB installer (click here to download). 


Select the Ubuntu 11.04 iso image and the pendrive from the Universal USB installer to start installing Ubuntu on to pendrive. The installer will take a few mnutes for finishing the task... Done!!! your pendrive Ubuntu is ready, restart the system and boot from the pendrive to use it...
Read rest of entry

09 May, 2011

Install tweetdeck in Ubuntu 11.04

TweetDeck is an adobe air application that helps us to perform all the online social networking activities using a single platform. It comes as a personal real time browser for connecting you with your contacts across Twitter, Facebook, MySpace, LinkedIn, Foursquare, Google Buzz and more... 


Installation

We need to install Adobe air installer prior to the installation of the tweetdeck. This is because the tweetdeck is built on adobe air framework. You can download the latest version of the adobe air installer linked here. Select .deb from the dropdown list asking for the version to download. 


Double click on the downloaded file (.deb) to install it using the Ubuntu Software center. 

Ignore the bad quality package error if it is shown by the package manager and continue installation...

You can access the Adobe air  installer later from Applications >> accessories for installing other applications based on air framework. 


Now download the tweetdeck.air file from this link. To install it first take the adobe air installer and browse for the tweetdeck.air file.


Then the tweetdeck installer will pop up and begin as shown in the following figures..


Thats all the information needed for installing tweetdeck in ubuntu 11.04. Tweetdeck will ask for authorizing your facebook, twitter etc... accounts in the first login itself... From my point of view tweetdeck is powerful and eyecandy since it provides better interface than any other desktop social networking applications does and it also integrates many social networking communities within a single interface. Lot of customizations are also possible...


Read rest of entry
 

Terminal Diary | techblog Copyright © 2009 Gadget Blog is Designed by jintu jacob Powered by Blogger