30 September, 2014

Install Raspbian (Debian Wheezy) OS on Raspberry Pi using Ubuntu


Hope you have seen my earlier posts regarding the raspberry pi over this link.This  post is about setting up Raspberry pi with Debian Wheezy on it. I am assuming that you have a Ubuntu/Debian running laptop already available. For those who are not yet in this universe (I mean using windows) please follow this link

Get the raspbian OS image from the official website. You can get the files either by the torrent link or through the direct download link.


If your sd card already contains a linux distribution, follow the steps mentioned in this link to factory reset the card

  • Run df -h to see what devices are currently mounted.

  • If your computer has a slot for SD cards, insert the card. If not, insert the card into an SD card reader, then connect the reader to your computer.

  • Run df -h again. The new device that has appeared is your SD card. The left column gives the device name of your SD card; it will be listed as something like /dev/mmcblk0p1 or /dev/sdd1. Ideally if you are plugging your card into laptops card reader using it's adapter device label will be /dev/mmcblk0p1.On the other side if the card is connected to a usb card reader, device name shown will be /dev/sdb1 or /dev/sdc1 or /dev sdd1 etc... The last part (p1 or 1 respectively) is the partition number but you want to write to the whole SD card, not just one partition. Therefore you need to remove that part from the name (getting, for example, /dev/mmcblk0 or /dev/sdd) as the device for the whole SD card.

  • Now that you've noted what the device name is, you need to unmount it so that files can't be read or written to the SD card while you are copying over the SD image.

  • Run umount /dev/sdd1, replacing sdd1 with whatever your SD card's device name is (including the partition number).

  • If your SD card shows up more than once in the output of df due to having multiple partitions on the SD card, you should unmount all of these partitions.

  • In the terminal, write the image to the card with the command below, making sure you replace the input file if= argument with the path to your .img file, and the /dev/sdd in the output file of= argument with the right device name. This is very important, as you will lose all data on the hard drive if you provide the wrong device name. Make sure the device name is the name of the whole SD card as described above, not just a partition of it; for example sdd, not sdds1 or sddp1; or mmcblk0, not mmcblk0p1.

    cd /path/containing/extracted/OSimage/previously/downloaded

    sudo dd bs=4M if=2014-09-09-wheezy-raspbian.img of=/dev/sdd

  • Please note that block size set to 4M will work most of the time; if not, please try 1M, although this will take considerably longer.

  • The dd command does not give any information of its progress and so may appear to have frozen; it could take more than five minutes to finish writing to the card. If your card reader has an LED it may blink during the write process. To see the progress of the copy operation you can run sudo pkill -USR1 -n -x dd in another terminal. The progress will be displayed in the original window and not the window with the pkill command; it may not display immediately, due to buffering.

  • Run sync; this will ensure the write cache is flushed and that it is safe to unmount your SD card. 
  • Remove the SD card from the card reader.

     
Read rest of entry

27 September, 2014

How to remove existing OS installation and reset the size of Raspberry Pi's SD Card

To remove existing OS installation and reset the size of Raspberry Pi's SD Card we are going to use one of the simple partition editor - gparted in Ubuntu/Debian.

Insert the SD Micro SD card that may or may not contains the Raspberry Pi's operating system into your laptops card reader slot. I am assuming that you got a Raspbian OS installed on the SD card during the life of this post :).

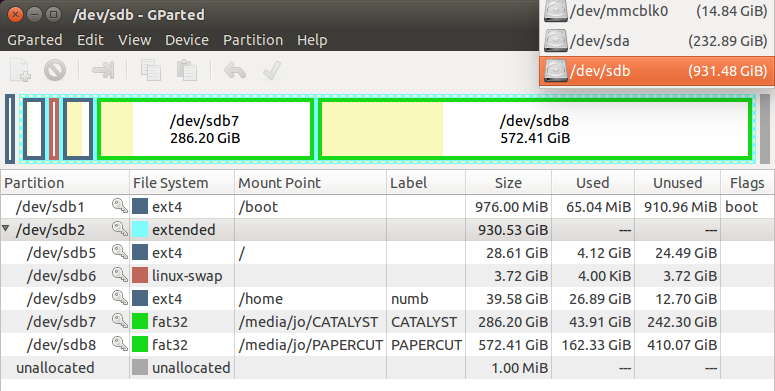
On the top right corner of the gparted, choose your SD card properly. You can identify your card using the size in Gigs(14.84GB) or the by checking for a disk name that starts with pattern - mmcblk*. If you choose wrong disk here in this menu, I will not be responsible for anything that sounds like "I lost my personal files" or "I lost my movies" or "my OS is crashed" and so on. See the below image that have the right selection.


Now unmount earch partition by right clikcing on them, if it is already mounted. Ideally the new versions of Ubuntu will mount the partitions automatically unless otherwise you tweak it to not do so.


Once the partition is unmounted, you are ready to delete it.
 
All the changes made so far will be, written to the memory device when the apply button is clicked as in below image.


Read rest of entry

How to install gparted (partition editor) on Ubuntu 14.04 LTS / Debian wheezy / Raspbian

Here is how to install one of the coolest partition editor for  Ubuntu 14.04 / Debian wheezy / Raspbian

Gparted a GUI based application that helps to work with partitions on your memory devices. It is packed with many features like
  •     Create partition tables, (e.g., msdos or gpt)
  •     Create, move, copy, resize, check, label, set new UUID, and delete partitions
  •     Enable and disable partition flags, (e.g., boot or hidden)
  •     Attempt
  •     Create space for new operating systems

GParted works with the following storage devices:
  •     Hard disk drives (e.g., SATA, IDE, and SCSI)
  •     Flash memory devices, such as USB memory sticks and Solid State Drives (SSD’s)
  •     RAID Devices (hardware RAID, motherboard BIOS RAID, and Linux software RAID)
  •     All sector sizes (e.g., devices with 512, 1024, 2048, 4096 byte sectors and more)


Update your software repository listing using the apt commands from the terminal:

sudo apt-get update


Now install gparted using the below given command

sudo apt-get install gparted


Once the installation is complete, launch gparted using the following command and provide the root credentials


sudo gparted


Read rest of entry

16 September, 2014

What happened when I heard about a raspberry Pi


The enthusiast inside me was just sleeping for a while (possibly around 3 years due to the damn corporate IT culture). And technically that was the reason why there wasn't enough posts recently. Suddenly last month on a trip to Coorg with @asuthoshjg & @nikhilkv, I heared about this little nasty motherboard from @asuthoshjg. The whole reason for the raspberry pi to hit our conversation was just my concern about a 4GB SD card in dslr that will easily run out of memory before we reach Coorg via Mysore. And pi just got hooked enough into my brain that browsing about it was the first thing that I did when reached back home after a sleepless night of driving and hunger.

The one best paragraph that explains everything about the pi in their community website is added below.

The Raspberry Pi is a credit-card sized computer that plugs into your TV and a keyboard. It is a capable little computer which can be used in electronics projects, and for many of the things that your desktop PC does, like spreadsheets, word-processing and games. It also plays high-definition video. We want to see it being used by kids all over the world to learn how computers work, how to manipulate the electronic world around them, and how to program.


It was one of the interesting things that I heared recently apart from the understanding that Saturday and Sunday are holidays at my workplace (sigh - literally). The another thing that increased my anticipation was that pi was available for online purcase at lot of sites. And I started getting excited about a pocket cpu that is powered by ARM6 700 Mhz processor with 512MB RAM, 4 USB ports, ethernet port and hdmi out at 4k-5k along with accessories. The plan was to replace the  plan of purchasing a vaccum-cleaner ( countless requests from my mother since last months) with the raspberry Pi. 


The funniest part was, Pi will just improve the count of number of computers (used and unused) at my home by 4. Four is a good number, by the way. It was not the Pi alone, but it was the enthusiasm and same old interest to these kind of stuffs when i was at my college, that is coming back to home along with the Pi soon.


Hopefully another post will be ready soon in a week when I get my hands on the Pi...


Read rest of entry

07 July, 2011

Change the DocumentRoot of Apache webserver (/var/www) in Debian / Ubuntu

The document root (also called as the web root) of the Apache web server is located at the /var/www directory by default. Document root is the place where we find all the web pages and server scripts. These files are loaded on the browsers when we type in a particular url to point to that server. 

The /var/www directory doesn't allow access for a user who doesn't have the root permission. It's a headache task to switch to the root mode by typing in the root password everytime even though you know the password, since you may have to change your webpages or scripts during its development stage  very frequently. So a better idea to avoid this problem is to change the default Document root directory to some other location which doesn't require root permission for access.


Change it dude !!!
- - - - - - - - - - - - - - - - - -#

Inorder to change the document root,

#1. Make a directory somewhere inside your home directory to use as the Document root. (not necessarily be home... you can make it anywhere). I named it 'www'

$ mkdir /home/jo/www

#2. Now we have to edit the one of the configuration file of the Apache webserver. The file is located @  /etc/apache2/sites-available/default (requires root permission to edit it).

$ sudo gedit /etc/apache2/sites-available/default

The file will be opened up in the gedit text editor. Now you have to edit the DocumentRoot directive in this file. Replace the /var/www with the /path/to/your/new/document/root in the lines 4 and 9 as shown in the figure below.


#3. Restart the apache webserver.

$ sudo /etc/init.d/apache2  restart


Now test it !!!
- - - - - - - - - - - - - - - - - -#

#1. Create a html/php file inside the Document Root directory (mine is @ /home/jo/www).

#2. Take the terminal and navigate to the Document Root directory (using cd command). Use chmod command given below to allow read+write+execute permission to all.

$ chmod 777 *

#3. Take your web browser and type in http://localhost and hit the enter key! The apache server will load the contents of your Document Root directory as in the figure.


Hope you have done it right!!!


Read rest of entry

Use the Debian Squeeze DVD/pendrive as a package repository

The Debian Squeeze DVD contains many application level packages which are not installed during the base operating system installation. Only core packages are installed during the basic Debian Operating system installation. For example the DVD is loaded with the graphical display managers such as Gnome, KDE and XFCE, but during the installation you can select only one among them.  There are a lot more stuff in the dvd, such as vlc media player, phpmyadmin, mysql etc. Here I am sharing how i used these Debian squeeze DVD as a repository to install those packages.

Adding the dvd to the repository
                 --------------------------------------------------

Take the terminal and type the following

$ sudo apt-cdrom add


This will add your DVD to the repositories list. 


For those who are using the pendrive as the installation media, pendrive should be mounted on the /media/cdrom directory. This can be done in two steps.


#1. Plug in the USB pendrive, then the new block device will be added under the /dev directory. We have to find this block device location for mounting and using the device. Use the following command to detect the block device's filename (selected in the image).
$ sudo fdisk -l


#2. Mount the block device into /media/cdrom.  

$ sudo mount  /dev/sdb1  /media/cdrom/


#3. Add the cdrom to the software repository list, as described earlier in the  case of the DVD.

$ sudo apt-cdrom add


Installing Packages
-------------------------------------
Now install the packages using the apt package manager. Check the sample below :- 
$ sudo apt-get install vlc

Thatz up...This trick will work for Ubuntu also...
Read rest of entry

31 January, 2011

Convert videos to 3gp, Mp4, Mp3 formats with Mobile media converter in Ubuntu

I have been searching for a cool media converter for my ubuntu box to convert my favourite videos into mobile formats like mp4 and 3gp etc... last week. I ended up with the one called Mobile Media Converter. Here i share my experience with this application. 

The Mobile Media Converter is a free video and audio converter for converting between popular desktop media formats like MP3, wma, ogg, wav, MPEG video, AVI, wmv, flv, mov and commonly used mobile devices/phones formats like AMR and 3GP video. Also iPod/iPhone and PSP compatible MP4 video are supported. Moreover, you can remove and add new formats  or devices through the internet.

The Mobile Media Converter has integrated a Youtube downloader which can be used to download flash videos and convert to any other formats. You can trim your clips for ringtone creation or any other purpose and crop your videos for removing up/down black bars or other unwanted parts of the image. Additionally, embedded subtitles can be encoded onto the video for watching  movies or shows with subtitles on devices that does not supports them.
 
You can download the this application from here. After downloading the debian package, open it with Synaptic or Ubuntu Software Center to complete the installation


Read rest of entry

23 November, 2010

Easiest way to add nautilus scripts in Ubuntu

                  Here is a bit tutorial for adding nautilus scritps in ubuntu that will help you to increase the system accessibility. These scripts can be run by simply clicking the right mouse button and selecting any from the 'scripts' menu. The imporatnt advantage of the nautilus scripts is its easiness, for example we dont need a an image processing standalone application to rotate an image or convert it to another format or to mirror it... The only think that we need is to select the image and right clicking on it and choosing any of the scripts... its simple and can be accessed as shown in the figure...


Installing Nautilus scripts in Ubuntu 

Nautilus scripts are available for dowloading from G-script site. You can use the link here  to download it directly to your pc. Follow the steps below to to complete the installation.

  • Untar the downloaded file using the following command
 $ tar -xvzf  nautilus-scripts.tar.gz
  •  You can see the scripts arranged in a heirarchical manner inside the extracted folder. Copy the contents of the extracted nautilus-scripts folder  to the .gnome2/nautilus-scripts folder in your home directory. Since it a hidden folder you can't see it @ the first time. Click Ctrl + H key after enterin the home directory to see the hidden directory.
  • That's all for the installation... You can access the scripts by selecting a file > right clicking it > and choosing any of the scripts arranged in categories under the scripts menu.
Hope you enjoyed th tip...
Read rest of entry

18 October, 2010

Download flash videos in Ubuntu without any application

Here is a simple trick that you can use to download your favourite flash videos from Youtube or metacafe without any application. You can stop your search for an apt application for downloading youtube videos... installing it on linux...Just leave everything...


Just login to the youtube and click on some videos to play it.


While the video is streaming, check the /tmp folder in the Ubuntu's file system. There you can see the same video file being updated with filename like Flash26YGf2.flv


You can copy this video file to some other place to make it viewed later. If you reload the the webpage or open some other video in the same tab/window of the web browser then the previous video file will be overwritten with the new one. So better is to copy the flash video file just after it is completely buffered in the web browser.


This tip has one another advantage too. If you want to see the end part of a flash video file which is about 1 hour length, you dont need to download the complete video from the beginning. You can seek the video into desired portion in the website. Then video file in the tmp directory will be starting from the new positon to which you seeked it.


So this technique is simple and cool where you need only a flash video player embedded in the web browser only to save the video. This methode can be used in situation where you  can play  video but blocked from downloading it since you have no account registered in those websites.
Read rest of entry

05 October, 2010

apt package manager : options & tricks

APT package manager in Debian systems can be used to download and install packages from online repositories. The APT commands (apt-get, apt-cache, and so on) can be used to install packages locally. However, it’s normally used for working with online software.

sudo apt-get update
Consults /etc/apt/sources.list and updates the database of available packages. Be sure to run this command whenever sources.list is changed.

apt-cache search <keyword>
Case-insensitive search of the package database for the keyword given. The package names and descriptions are returned where that keyword is found.

sudo apt-get install <package>

Download and install the given package name as found in the package database.

sudo apt-get -d install <package>
Download the package only, placing it in /var/cache/apt/archives.

apt-cache show <package>

Display information about the software from the named package.

sudo apt-get upgrade


Check updates for all installed packages and then prompt to download and install them.

sudo apt-get dist-upgrade

Updates the entire system to a new release, even if it means removing packages. (Are you on nuts to do this?)

sudo apt-get autoclean

Can be run anytime to delete partially downloaded packages, or packages no longer installed.

sudo apt-get clean


Removes all cached packages from /var/cache/apt/archives to free up disk space.

sudo apt-get --purge remove <package>

Remove the named package and all its configuration files. Remove the --purge keyword to keep config files.

sudo apt-get -f install

Do a sanity check for broken packages. This tries to fix any “unmet dependency” messages.

apt-config -V


Print version information of installed APT utilities.

sudo apt-key list


List gpg keys that APT knows about. 

apt-cache stats 

Print statistics on all packages installed.

apt-cache depends


Print dependencies for a package (whether it’s installed or not). 

apt-cache pkgnames 

List all packages installed on the system.
Read rest of entry

25 September, 2010

IP Configuration in Ubuntu

Here is a howto about the configuring ip using networking related files in Ubuntu / Debian systems.

File: /etc/network/interfaces
    This file contains network interface configuration information  for the ifup and ifdown commands. This is where you configure how your system is connected to the network.

Three important Interfaces are:
        # lo: Loopback interface (it is an internal 
            networking mechanism. It is used to
            test applications...)
        # eth0: First ethernet interface card
        # wlan0: First wireless network interface


Use following command to edit the interfaces file

$ sudo gedit /etc/network/interfaces

Add one or more of the stanzas below 

    Static IP example:
    auto lo
    iface lo inet loopback

    auto eth0
    iface eth0 inet static
            address 208.88.34.106
            netmask 255.255.255.248
            broadcast 208.88.34.111
            network 208.88.34.104
            gateway 208.88.34.110
                   

    Dynamic IP (DHCP) example:
    auto lo
    iface lo inet loopback

    auto eth0
    iface eth0 inet dhcp

    auto eth1
    iface eth1 inet dhcp

    auto eth2
    iface eth2 inet dhcp

    auto ath0
    iface ath0 inet dhcp

    auto wlan0
    iface wlan0 inet dhcp
                   
    Lines  beginning with the word "auto" in the interfaces file are used to identify the physical interfaces to be brought up when ifup is run with the -a option.  (This option  is  used by the system boot scripts.)  Physical interface names should follow the word "auto" on the same line.

GUI Network Tools:

    * NetworkManager or wicd can be used as the GUI tools for the network management. Better use wicd network manager if you have to rely more upon the wireless internet than the wired ones
.
Read rest of entry

28 June, 2010

important bash commands for system administration


As you know the terminal is the power tool that every linux user may have to come in contact even once in their computer life. Here is a post about controlling and managing your system using the gnome terminal.

How to shut down the system
 

$shutdown -h now

The word 'now' is enough to shutdown the system at this instant itself. You must be sudo before executing this command. You can specify the time instead of the word 'now' so that the system will shut after that time limit. Other  valid  formats  are  +m,  where m is the number of minutes to wait until shutting down and hh:mm which specifies the time on the 24hr clock.

       -r     reboots the system after shutdown

       -h    Requests  that  the system be either halted

              or powered off after it has been brought 
              down

       -c    Cancels  a  running  shutdown.   TIME is not 

              specified with this option, the first     
              argument is MESSAGE.

       -k    Only send out the warning messages and 

              disable  logins,  do  not actually bring the 
              system down.

How to take the root shell prompt
 

You can take the root shell prompt using the root password as follows

$ sudo su
 

How to switch between virtual consoles

In most debian based systems there are six switchable VT100-like character consoles available to start the command shell directly on the Linux host. Unless you are in a GUI environment, you can switch between the virtual consoles by pressing the Ctrl - Alt keys and one of the F1 --- F6 keys simultaneously. Each character console allows independent login to the account and offers the multiuser environment. You can get back to the X Window System, normally running on the virtual console 7, by pressing Ctrl - Alt - F7

Alternatively we can use the command chvt to  switch between virtual consoles from the command line
 

$ chvt  3        (switches to 3rd console )


How to quit the terminal

Press Ctrl + D to terminate the shell activity.


To create a new user account 


To create a new user account from the terminal type in as follows...


$ adduser carbon


This will add the user with name 'carbon'.  You can remove this user and it's home directory by using the following command.

$ deluser --remove-home carbon


Read rest of entry
 

Terminal Diary | techblog Copyright © 2009 Gadget Blog is Designed by jintu jacob Powered by Blogger