17 August, 2011

setup lamp server on debian/ubuntu || the easiest & the best way


The LAMP server is the commonly abbreated for Linux Apache MySql PHP server. This is a platform where web pages can be build/test/run using linux.

So setting up your LAMP server includes installing all those above said packages and configuring them to work together.

You can use either terminal or synaptic package manager to install these packages [and should have a working internet connection]. Anyway we may have to use the terminal for configuring them. So better move with the Terminal [Applications > Accessories > Terminal] itself.

1. Install Apache server

------------------------------
Below command will install apache server in your system


$ sudo apt-get install apache2

when the installation finishes, test weather it's working by pointing your web browser[firefox / chrome . . . ] to the following web address.
http://localhost/  

You should see a folder entitled apache2-default/. Open it and you will see a message saying something like > "It works!"

2. Install PHP

- - - - - - - - - - - - -

copy-paste the command given below onto a terminal and hit the enter key.


$sudo apt-get install php5 libapache2-mod-php5

While PHP installation finishes, restart the apache web server to make it compatible with apache using the following command.


$ sudo /etc/init.d/apache2 restart

testing PHP

To ensure there are no issues with PHP let's give it a quick test run.

Step 1. In the terminal copy/paste the following line:


$ sudo gedit /var/www/test.php

This will open up a file called test.php.

Add the following line into the test.php, save and close the file.


  <?php
      phpinfo();
  ?>


Now open you're web browser and type the following into the web address:


http://localhost/test.php


Note : You can change the location of the Document root [by default it is /var/www/] by reading this article.

Install MySQL
- - - - - - - - - - - - - - 

open up the Terminal and then copy/paste this line:


sudo apt-get install mysql-server libapache2-mod-auth-mysql php5-mysql


install phpmyadmin
-------------------------


sudo apt-get install phpmyadmin

Now just restart Apache and you are all set!


sudo /etc/init.d/apache2 restart


That's enough! your LAMP server  is ready, and now you can can move up with your pretty codes >>
Read rest of entry

07 July, 2011

Change the DocumentRoot of Apache webserver (/var/www) in Debian / Ubuntu

The document root (also called as the web root) of the Apache web server is located at the /var/www directory by default. Document root is the place where we find all the web pages and server scripts. These files are loaded on the browsers when we type in a particular url to point to that server. 

The /var/www directory doesn't allow access for a user who doesn't have the root permission. It's a headache task to switch to the root mode by typing in the root password everytime even though you know the password, since you may have to change your webpages or scripts during its development stage  very frequently. So a better idea to avoid this problem is to change the default Document root directory to some other location which doesn't require root permission for access.


Change it dude !!!
- - - - - - - - - - - - - - - - - -#

Inorder to change the document root,

#1. Make a directory somewhere inside your home directory to use as the Document root. (not necessarily be home... you can make it anywhere). I named it 'www'

$ mkdir /home/jo/www

#2. Now we have to edit the one of the configuration file of the Apache webserver. The file is located @  /etc/apache2/sites-available/default (requires root permission to edit it).

$ sudo gedit /etc/apache2/sites-available/default

The file will be opened up in the gedit text editor. Now you have to edit the DocumentRoot directive in this file. Replace the /var/www with the /path/to/your/new/document/root in the lines 4 and 9 as shown in the figure below.


#3. Restart the apache webserver.

$ sudo /etc/init.d/apache2  restart


Now test it !!!
- - - - - - - - - - - - - - - - - -#

#1. Create a html/php file inside the Document Root directory (mine is @ /home/jo/www).

#2. Take the terminal and navigate to the Document Root directory (using cd command). Use chmod command given below to allow read+write+execute permission to all.

$ chmod 777 *

#3. Take your web browser and type in http://localhost and hit the enter key! The apache server will load the contents of your Document Root directory as in the figure.


Hope you have done it right!!!


Read rest of entry

24 January, 2011

Setting up CGI-BIN in apache in Ubuntu linux

Defining the CGI...

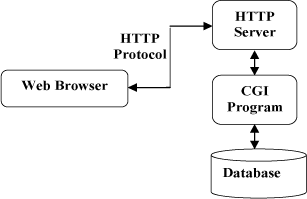
The Common Gateway Interface (CGI) is a method used for server programming in such a way that, web applications can be equipped with scripting languages like python as their back end, for processing the client requests. CGI are external gateway programs to interface with information servers such as HTTP servers.

CGI defines a way for a web server to interact with external 'content generating' programs, which are often referred to as CGI programs or CGI scripts. It is the simplest, and most common, way to put dynamic content on your web site. 

You might be quite familiar with the html-php web pages, where the php processor manages the dynamic content generation, while html & css gives the presentation of this content as a webpage. In CGI programming we can use scripting languages such as python, instead of php, for processing data coming from the html pages. 

Configuring Apache server to run CGI scripts  . . .

Here i will show you how to setup CGI on Apache web server in Ubuntu 10.10. 

1. First we have to enable three modules cgi, cgid and userdir Userdir is the module that enables the user to change the web server's root from /var/www to the public_html folder in the home directory. Replace the module_name with the above modules one after another

$ sudo a2enmod module_name

2. After enabling the modules we have to restart the apache server to make the changes take into effect.  This can be done as follows

$ sudo /etc/init.d/apache2  restart

3. Create the public_html inside your home folder to set it as the web root, and cgi-bin directory where the cgi-programs are placed.

$ cd ~

                                    $ mkdir public_html
                                    $ mkdir public_html/cgi-bin

4. Now we have to edit some configuration files of the apache server in the /etc/apache2 directory.  

$ cd /etc/apache2

The directory looks as follows..


5. Now move to the sites-available directory and open the file named default for editing it.

$ sudo gedit  sites-available/default

6. Move on to the line in the default starting with ScriptAlias, replace this line with the text inside the quotes given below. Don't forget to replace 'jo' with your username.

" ScriptAlias /cgi-bin/ /home/jo/public_html/cgi-bin/ "

By aliasing we can refer to a script inside the cgi-bin directory by just using /cgi-bin/scriptname.py instead of typing the full path.
7. Now change the <Directory> tag just below it with the same location given in the ScriptAlias. Please refer the screenshot to view the changes
  
8. Add the text inside quotes given below, just after the line starting with Options +ExecCGI...... (in screenshot)

" SetHandler cgi-script "

This line will tell the apache to consider any script (python, perl, php...) inside the cgi-bin directory as executable...

9. It's time to restart the apache server to apply the changes.

$ sudo /etc/init.d/apache2  restart

This is all about configuring the apache server to accomodate cgi scripts... 

Writing the first CGI program . . .

Two things have to be considered while writing the cgi scripts. First, all output from your CGI program must be preceded by a particular type HTTP header that tells the client what sort of content it is receiving. It looks as follows . . .

Content-type: text/html 


Secondly, your output needs to be in HTML, or some other format that a browser will be able to display. Most of the time, this will be HTML, but occasionally you might write a CGI program that outputs a gif image, or other non-HTML content.

Taking the first scoop...

Let's try a small cgi script in python as shown below.


 #!/usr/bin/python
 print "Content-type: text/html\n\n"
 print "Hello, World."
 for i in 'hello':
     print i+'\n' 

Save the progam with name sample.py in the public_html/cgi-bin/ directory. 


Now make the sample.py as an executable program with chmod command in bash as shown below


                                    $ cd ~/public_html/cgi-bin/
                                    $ chmod 777 *


Now take the web browser and type in the address bar as follows: 

                                    localhost/cgi-bin/sample.py
or
                                    localhost/~jo/cgi-bin/sample.py
[ replace 'jo' with your username ]  

Type the above line and hit the enter key. If the browser shows hello world (refer screenshot below) then everything is working right. 

Read rest of entry
 

Terminal Diary | techblog Copyright © 2009 Gadget Blog is Designed by jintu jacob Powered by Blogger