31 January, 2011

Convert videos to 3gp, Mp4, Mp3 formats with Mobile media converter in Ubuntu

I have been searching for a cool media converter for my ubuntu box to convert my favourite videos into mobile formats like mp4 and 3gp etc... last week. I ended up with the one called Mobile Media Converter. Here i share my experience with this application. 

The Mobile Media Converter is a free video and audio converter for converting between popular desktop media formats like MP3, wma, ogg, wav, MPEG video, AVI, wmv, flv, mov and commonly used mobile devices/phones formats like AMR and 3GP video. Also iPod/iPhone and PSP compatible MP4 video are supported. Moreover, you can remove and add new formats  or devices through the internet.

The Mobile Media Converter has integrated a Youtube downloader which can be used to download flash videos and convert to any other formats. You can trim your clips for ringtone creation or any other purpose and crop your videos for removing up/down black bars or other unwanted parts of the image. Additionally, embedded subtitles can be encoded onto the video for watching  movies or shows with subtitles on devices that does not supports them.
 
You can download the this application from here. After downloading the debian package, open it with Synaptic or Ubuntu Software Center to complete the installation


Read rest of entry

27 January, 2011

python xmlrpc : a simple client server connection mechanism with greater possibilities

A byte of theory . . .

XML-RPC is a Remote Procedure Call method that uses XML passed via HTTP as a transport. With it, a client can call methods with parameters on a remote server (the server is named by a URI) and get back structured data. This module supports writing XML-RPC client code; it handles all the details of translating between conformable Python objects and XML on the wire.

A byte of surprise . . .


Here the xmlrpc library of the python does the magic, by leaving the  programmer give maximum attention to logic by freeing him from the concepts of the sockets, binding, listening, accepting, etc ... which are the primary constraints while developing a  network based program. Remote Procedure Call (RPC) mechanism allows the client to call any function defined and registered as 'remote' in the server.

A byte of reality . . .


xmlrpc library offers communication between the client and server in such a way that, we can define functions in one machine (say a server) and access those functions from the other machine (say a client). Here the communication occurs in two ways.
    >< client calling the remote server function can 
           pass arguments to it. So the server recieves this 
           arguments 
   ><  Server can transport some data as the return 
           value of the function that the client called

A byte of practical . . .


    Inorder to make the client and server communicate together we need to create the server object and client object with the ip and port of the server. Here i am running the client and server on the same machine. You can replace 127.0.0.1 in sample code with the ip of the server where you need to connect the clients. Port should be greater than the 1024.

server program

   import xmlrpclib
   from SimpleXMLRPCServer import SimpleXMLRPCServer
   def add(a, b) :
         return a+b
   server=SimpleXMLRPCServer(("127.0.0.1",9009))
   server.register_function(add)
   server.serve_forever()


In server program we have to create the object of the server with a method called SimpleXMLRPCServer() with parameters as ip and port. Then the function has to be registered inorder to access it remotely. The serve_forever() function is used to put the server wait for the client request infinitely.
client program
    
    import xmlrpclib
    server = xmlrpclib.ServerProxy('http://127.0.0.1:9009')
    a=input("No 1: ")
   
b=input("No 2: ")
    result = server.add(a,b)
    print "Result  :  "+result

In the client program we will use the ServerProxy() method to specify the details(port, ip) of the server which is having a function named add() which can be called remotely. So two integers a,b are passed as parameters to the remote function. Remote function calculates the sum and returns the result to the called function.

I felt this xmlrpc library as the most awesome mechanism provided by the python. It makes the programming to the very simplest extent so that the users can give maximum attention to developing logic, instead of worrying about the networking constraints and errors related to it...


Read rest of entry

python urllib library : the basics

               urllib and urllib2 are Python modules for fetching URLs. It offers a very simple interface, in the form of the urlopen function which is capable of fetching URLs. It also offers a  slightly more complex interface for  handling features like basic authentication, cookies, proxies and soon.

urllib2 supports fetching URLs for many URL schemes  such as ftp, http -- for example “ftp” is the URL scheme of “ftp://python.org/“

Fetching URLs : urlopen()
 
Now it is the time to play off the theories. The simplest way to use urllib2 to open urls is as follows:
  import urllib2
  response = urllib2.urlopen(’http://python.org/’)
  html = response.read()
You can use the above method to store the complete contents of a file into a variable without writing it to a local file... 

Sending Data along with url 
                Sometimes you want to send data to a URL (often the URL will refer to a CGI script or other web application). With HTTP, this is often done using  a GET/POST request. This is what your browser does when you submit a HTML form that you filled in on the web. In the common case of HTML forms, the data needs to be encoded in a standard way, and then passed to the Request object as the data argument. In python encoding is done using a function from the urllib library.

  import urllib
  import urllib2
  url = ’http://www.someserver.com/cgi-bin/register.cgi’
  values = {’name’ : ’Michael Foord’,
                             ’location’ : ’Northampton’,
                             ’language’ : ’Python’ }
  data = urllib.urlencode(values)
  req = urllib2.Request(url, data)
  response = urllib2.urlopen(req)
  the_page = response.read()

This can be done manually as follows :

  import urllib2
  import urllib
  data = {}
  data[’name’] = ’Somebody Here’
  data[’location’] = ’Northampton’
  data[’language’] = ’Python’
  url_values = urllib.urlencode(data)
  print url_values
  name=Somebody+Here&language=Python&location=Northampton
  url = ’http://www.example.com/example.cgi’
  full_url = url + ’?’ + url_values
  data = urllib2.open(full_url)

Fetching files : urlretrieve()

We can use urllib's urlretrieve function to download a file over internet and save it in a new name. We can download text / image / video files using this function if the source file is available as a url.

 import urllib
 url=https://blogger.googleusercontent.com/img/b/R29vZ2xl/AVvXsEjAEaU33AHSR1u5v4ulLwW6ll9sIy5j7GbCoFQkC6bXbnl8EQrf8NPjlVbeC_6OShG00vi0R6sT_GTXkueNsXUnZEkq2IcLwyRmIQke2JzeKrh7lWd9YR5Sjob3a9AZsfuh4ENpmt1MT8Wy/s104/ubuntu.png 
 urllib.urlretrieve(url, new_image.png) 
Hope you have enjoyed the basics of the urllib library of python...

Read rest of entry

26 January, 2011

pgrep command for listing PID's of currently running processes

pgrep is a bash command that looks through the currently running processes and lists the process IDs which matches the selection criteria to stdout.  All the criteria given as parameters to pgrep have to matched.
$ pgrep fi 
         -- List the PID of process names match with "fi".   

$ pgrep -l fi 
         -- Same as above and process name also get 
             listed.  
 
$ pgrep -vl fi 
         -- List all processes, which name not match    
             with "fi".   

$ pgrep -xl fi 
         -- List all processes, which name exactly match  
             with "fi".  
 
$ pgrep -f sbin 
         --List all processes, which are running from  some 
            sbin folder. It check the command line also.  
 
$pgrep -c fi
         --Show the count of matching processes.  
 
$ pgrep -d, fi 
         -- List the matching process id in CSV format.  
 
$ pgrep -t tty1 
         -- List the process controlling the term tty1. 
 
$ pgrep -u root, jo 
         -- List all processes owned by root and jo. 
 
$ pgrep -u jo gnome
         -- List the process called sshd and owned  by jo.  
 
$ pgrep -n fi 
          -- Show only the newest process.  
 
$ pgrep -o fi 
          -- Show only the oldest process.  
Read rest of entry

24 January, 2011

Setting up CGI-BIN in apache in Ubuntu linux

Defining the CGI...

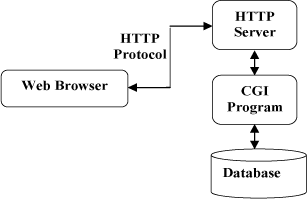
The Common Gateway Interface (CGI) is a method used for server programming in such a way that, web applications can be equipped with scripting languages like python as their back end, for processing the client requests. CGI are external gateway programs to interface with information servers such as HTTP servers.

CGI defines a way for a web server to interact with external 'content generating' programs, which are often referred to as CGI programs or CGI scripts. It is the simplest, and most common, way to put dynamic content on your web site. 

You might be quite familiar with the html-php web pages, where the php processor manages the dynamic content generation, while html & css gives the presentation of this content as a webpage. In CGI programming we can use scripting languages such as python, instead of php, for processing data coming from the html pages. 

Configuring Apache server to run CGI scripts  . . .

Here i will show you how to setup CGI on Apache web server in Ubuntu 10.10. 

1. First we have to enable three modules cgi, cgid and userdir Userdir is the module that enables the user to change the web server's root from /var/www to the public_html folder in the home directory. Replace the module_name with the above modules one after another

$ sudo a2enmod module_name

2. After enabling the modules we have to restart the apache server to make the changes take into effect.  This can be done as follows

$ sudo /etc/init.d/apache2  restart

3. Create the public_html inside your home folder to set it as the web root, and cgi-bin directory where the cgi-programs are placed.

$ cd ~

                                    $ mkdir public_html
                                    $ mkdir public_html/cgi-bin

4. Now we have to edit some configuration files of the apache server in the /etc/apache2 directory.  

$ cd /etc/apache2

The directory looks as follows..


5. Now move to the sites-available directory and open the file named default for editing it.

$ sudo gedit  sites-available/default

6. Move on to the line in the default starting with ScriptAlias, replace this line with the text inside the quotes given below. Don't forget to replace 'jo' with your username.

" ScriptAlias /cgi-bin/ /home/jo/public_html/cgi-bin/ "

By aliasing we can refer to a script inside the cgi-bin directory by just using /cgi-bin/scriptname.py instead of typing the full path.
7. Now change the <Directory> tag just below it with the same location given in the ScriptAlias. Please refer the screenshot to view the changes
  
8. Add the text inside quotes given below, just after the line starting with Options +ExecCGI...... (in screenshot)

" SetHandler cgi-script "

This line will tell the apache to consider any script (python, perl, php...) inside the cgi-bin directory as executable...

9. It's time to restart the apache server to apply the changes.

$ sudo /etc/init.d/apache2  restart

This is all about configuring the apache server to accomodate cgi scripts... 

Writing the first CGI program . . .

Two things have to be considered while writing the cgi scripts. First, all output from your CGI program must be preceded by a particular type HTTP header that tells the client what sort of content it is receiving. It looks as follows . . .

Content-type: text/html 


Secondly, your output needs to be in HTML, or some other format that a browser will be able to display. Most of the time, this will be HTML, but occasionally you might write a CGI program that outputs a gif image, or other non-HTML content.

Taking the first scoop...

Let's try a small cgi script in python as shown below.


 #!/usr/bin/python
 print "Content-type: text/html\n\n"
 print "Hello, World."
 for i in 'hello':
     print i+'\n' 

Save the progam with name sample.py in the public_html/cgi-bin/ directory. 


Now make the sample.py as an executable program with chmod command in bash as shown below


                                    $ cd ~/public_html/cgi-bin/
                                    $ chmod 777 *


Now take the web browser and type in the address bar as follows: 

                                    localhost/cgi-bin/sample.py
or
                                    localhost/~jo/cgi-bin/sample.py
[ replace 'jo' with your username ]  

Type the above line and hit the enter key. If the browser shows hello world (refer screenshot below) then everything is working right. 

Read rest of entry
 

Terminal Diary | techblog Copyright © 2009 Gadget Blog is Designed by jintu jacob Powered by Blogger